
AdamCatalyst
-
Posts
479 -
Joined
-
Last visited
-
Days Won
64
Content Type
Profiles
Forums
Events
Everything posted by AdamCatalyst
-
Happy New Years to you too!
-
Thanks! Sorry, I know nothing about retroid. Is it a handheld? A platform?
-
 OK, I'm game to try! Will follow the instructions that @smozoma posted above to get RA setup. I don't do the Discord thing, but am willing to learn if it helps.
 -
Hey folks, Update 2.1 is now live, available in the usual place. I've included thumbnail artwork for popular emulators. Please let me know if there is a more desirable size / resolution for whatever you use. cheers, -a
-
Thanks for taking the time to write! I'm glad to hear that you enjoy. Please come back for the updates throughout the season. Minor roster update coming out today. As for blood, I'm not inclined to do that, it's just not my thing. As for fighting, I would if I could, but that is way beyond my skill level. I believe that Others have tried, but no-one has had any luck. Maybe with a full decompile others might be able to do it, but even with a decompile I'd be in over my head.
-
You are really good at this! I years worth of unanswered emails, and weeks worth of unopened emails. If I win the lottery, I will see if I can afford to hire you to work through my correspondence backlog.
-
I had a question for folks. I wanted to start including a small cover art jpeg in the ZIP. Does anyone know what size is appropriate for popular emulators? FYI, I will be putting up a version 2.1 update any day now. Mostly just a roster update. I'm still waiting to figure out if Pacioretti is really going to come back, and what the Caps lines are looking like with him.
-
Thanks for the feedback! YES, will make those changes ASAP.
-
Wait what!?! You updated this!?!? This is still my favourite ROM mod, and the one that I am most jealous that someone thought of first. I'd love to try a crack at something like this one day. But I'd want to try and do it as a patch that could be applied to an existing ROM, so basically a skin. Anyways, looking forward to going this one a spin again!
-
Advice for Modders, Meddlers, and other Creative Rabble-Rousers (last updated 2024 01 03) Getting Started Start with as clean a ROM as possible. This will make it the easiest to edit, and puts you in the position of having the most creative control. I recommend starting with either the 28 or 32 team templates, and/or an original verified [!] good ROM dump. Beyond being able to accommodate more teams, the templates have the advantages of many of the graphics already being "de-compressed", which will make editing much easier. Just note that the templates are not "clean", in that they have some elements modified or removed that you may want to preserve or restore. I sometimes find myself going back to the original ROM to verify how things originally were. Basic good practices: Make sure that you have a file versioning and naming syntax system, as well as an automated backup system. Document everything that you do. Go slowly at first. When in doubt, change one variable at a time. Read lots of forum posts and do the tutorials. Even ones that you think don't apply to you. Valuable knowledge can be found in unexpected places. Don't be afraid to start over, multiple times. If you've documented things, this might go shockingly quickly. Learn from Others Review the detailed tutorial posts that folks have taken the time to write, the newer the (usually) better. The more you see the entire picture, you start to see patterns. The more patterns that you start to recognize, the faster you will get, and you will start to be able to make off-the-books discoveries of your own. Play lots of other people's ROMs. Take notes. Don't blindly apply pre-made patches to your ROM. Run a comparison after patching, to see exactly how the code has changed. Try to understand what was changed and why. Imitation is an underrated form of learning. Look at what others have done (and you admire), and then try to re-create it yourself. The process of manually recreating something is an invaluable learning process, where you can build explicit and implicit knowledge. Furthermore, even if you start with imitation, you will naturally make different specific choices along the way that will eventually lead to it becoming your own thing. Don't re-invent the wheel if you don’t need to. As a counterpoint to my advice to start with as "clean" a ROM as possible, or trying to manually imitate things, don't be shy about ripping off code from other people's ROMs. But always give credit where it is due. And if in doubt, give credit. You should clearly know when something was the result of your labour alone. Share what you know. But also share what you have found, but don’t understand. The more the community knows, the more than community will be able to help you. And your loose ends might be someone else's treasure. Getting More Done Use a comparison tool (I use “Beyond Compare”) to help isolate relevant differences in code from one person's ROM to another. By comparing ROM "A" and ROM "B", I've been able to sometimes make new discovery "C". This is my #1 tip for anyone. Consider using a prioritization model, such as MSCW, where you define what a release Must do, Should do, Could do, anger very importantly, Won’t do. Further to that last one… Give yourself limitations. This can be just as important as goals for some people. Develop efficient testing routines. This can take up a lot of time. Stop and think about re-designing your workflow from time to time. Personal Development Get off the computer. A good idea to play, then work on paper. All tools and interfaces have biases that effects us. Find the ones that wrk best for you and/or change things up to help you change up your thinking and doing. Make big picture decisions about art direction, creative direction, colours, etc. Give yourself both strategic guidance and limitations. Figure out what you want to do before you do it. Unless you find yourself stuck with indecision. In which case, just start doing it, and figure out what you want later. Make mistakes faster. Figuring out how much time to spend planning and critically evaluating plans versus just mindlessly doing is a lifelong challenge. It’s easy to waste time either which way. In my personal teaching, I personally find that most people over-think things. Push yourself to mockup up ideas as quickly as possible. If it’s a good idea, that will show up in a terribly rough mockup. But there is no way to know for sure until it is tried. Consider separating your personal creative process, your personal critical processes, your personal technical execution process, and your personal skill building processes. “Creatives” who work alone sometimes face paralysis from trying to think through too many roles at once. If you are an army of one, consider role-playing through different steps. For instance, when you’re creative, create with reckless abandon. Do not pre-judge. When your creative session is up, hand it to your critical self, and assess what is working, what isn’t, and give your creative self directives for the next creative session. This may sound silly, but trust me, I’ve been teaching young designers for over a decade, and this compartmentalization can be extremely helpful. Specific Areas of Interest Before editing player sprite uniforms, be aware that different ROMs have already changed the layout of the colours on the uniforms. This is a huge amount of work, and your ROM might benefit from taking the player sprite tiles from another ROM. You Amy also be able to make the changes that you want more easily by “diffing” two different sets of player sprites, in order to isolate key elements or colours… …Speaking of Colours Make sure that you are familiar with basic colour theory using a Hue, Saturation, Value model. Understand that human beings perception of tone is much more consistent than their perception of hue. Furthermore, we are much more sensitive to contrast of tone than contrast of hue or saturation (hence why we use 4:2:0 encoding in video etc). So, when making colouration decisions, you usually want to err on the side of prioritizing tonal relationships over accuracy in hue over accuracy in saturation. This usually looks better. You can toggle your screen into black & white mode to review the tonal values. “If your colours don’t work in black & white, your colours don’t work.” ® When selecting your colours, it is very helpful to have an overall concept of the colouration that you are looking to achieve. For instance, should it look realistic? Like watching a game in person? Vibrant? Like watching a game on TV in the current day? Like watching archival footage of a game? Like it was shot on film? Shot on video? A great example of this is @von Ozbourne's Olympic Hockey 1920 ROM. Consider your colours holistically. Put together a meta-palette of all the colour palettes in your ROM. I found this approach extremely valuable in setting the overall look and feel. When you track the relationship between the pink colours of players faces, the pink colours audience members faces, and the pink-ish highlights on red sweaters etc., you are able to make decisions that have a more immersive holistic impact. You might consider something like this as a start: While it is useful to look at the official colours for team logos, etc. understand that the colour that you see is not the same thing as the colours that are specified. There are all kinds of other factors that affect our perception of colour, including the lighting that it is shown with, the texture of the fabric the colour is applied to, any mediating lenses or recording mediums, etc. If going for anything other than an unnaturally vibrant presentation, you will likely want to skew those official colour values towards your intended art direction effect. Aside from collecting official colours, you may also want to collect image references for the colours that you are trying to achieve. For instance, grabbing a bunch of screen captures of recent broadcasts of Leafs home games will depict the blue colour of the Leafs uniforms differently than the official RGB colour values. You can use tools like the built-in “Digital Color Meter” on a Mac to sample the colour values used in the photos. Use a large aperture size to average the values in a range of contiguous pixels at once. Furthermore, note what you are sampling (sweater shadow, helmet highlight, etc.) to get a sense of how those official colour value transform in an image. If using official colours, you will inevitably come across scenarios where it is unclear what the Sega MD / Genesis equivalent will be. In general, I would advise in always “rounding” colour values in the same direction for relative consistency, but in some case it may be desirable to have exceptions, when considering the overall colour palette of your ROM. Further to the last tip, you will inevitably also encounter scenarios where you will want to darken or lighten an official colour in order to depict shadows and highlights on a players uniform, or anti-alias a logo, etc. Again, I would advise to make these adjustments with relative consistently for a more immersive effect, but you will also want to consider your art direction etc. It can be helpful to understand that in real-life colours look less saturated than when shown on a back-lit display like a television. Furthermore, in real-life a medium tone colour will usually appear to de-saturate (towards black) as less light is applied to it, and conversely appear to saturate more heavily as more colour is applied to it. However, eventually when too much light is applied it, it will again appear to de-saturate (towards white). When watching a game on a screen, the colour-grading on the broadcast (as well as the colour grading on the display device) can sometimes diminish this effect by compensating with more saturation, particularly in shadows. I don’t recommend importing images into TileM and using using TileM to reduce or assign the colour palette, as it often does a mediocre job. I highly recommend defining the colour palette in TileM or Retro Graphics Toolkit or similar software, and then assigning those colours manually in software like Photoshop for much higher quality results. Hand coloured (and had-drawn) almost always looks better than auto-coloured or (auto-digitized.) Tools that I Don’t Use, but I Do Recommend EA NHL Specific EARE (Smoz’s “EA Rom Edit” utility) https://forum.nhl94.com/index.php?/topic/10443-eare-ea-rom-editor-for-nhl94/ Libre Office Calc (free spreadsheet software) https://www.libreoffice.org Microsoft Excel (more powerful spreadsheet software) https://www.microsoft.com/en-CA/microsoft-365/excel Tools that I Do Use EA NHL Specific NOSE (Wboy's “New Old Skool Edit” app) https://forum.nhl94.com/index.php?/topic/26368-nose-latest-version-download/ NHL Hockey Roster Tool (tool for quickly exporting / importing rosters too and form CSV) https://forum.nhl94.com/index.php?/topic/11779-tool-roster-extracterimporter-tool/ Smoz's Patch Applicator (quickly and easily apply some popular hacks and patches) https://forum.nhl94.com/index.php?/topic/12181-tool-hack-applicator-aka-smozrom/ Rosters, Lines, etc. Apple Numbers (any good Spreadsheet apps will do. Every one has some uniquely valuable tricks, but lack some functions that others have.) https://www.apple.com/numbers/ Table Capture (utterly invaluable browser plugin for scraping data) https://www.georgemike.com/tablecapture/ Text Sniper (useful for quickly grabbing any text / numeric / tabular data from a web page) https://www.textsniper.app Visuals Adobe Photoshop Desktop (Bitmap editing, Dithering, Image Comparison, Rasterization, and nearly anything image related) https://www.adobe.com/ca/products/photoshop.html Adobe Photoshop Tablet (manually drawing / editing dithering with a stylus.) https://www.adobe.com/ca/products/photoshop/ipad.html Apple’s Digital Color Meter https://support.apple.com/en-ca/guide/digital-color-meter/welcome/mac HivePal (Palette editor) https://www.romhacking.net/utilities/1182/ Retro Graphics Toolkit (Dithering, Palette editing, and other specialized tasks) https://github.com/ComputerNerd/Retro-Graphics-Toolkit/tree/master TileMolester 0.16 https://www.romhacking.net/utilities/109/ Coding, Testing, & Export AFS FIX CS MD 32X (checksum fixer) https://www.romhacking.net/utilities/1610/ Beyond Compare (file comparisons and more) https://www.scootersoftware.com I can’t stress this enough: I have personally found file comparison software an utterly invaluable tool. I use "Beyond Compare" almost as much as I use my HEX editor. This enables me to isolate mods, quickly change variables, search for things way more effectively, debug way faster, and do a much higher level of quality control. I’m still discovering new ways that it can speed things up. Genesis Plus GX (more accurate Genesis emulator) https://github.com/ekeeke/Genesis-Plus-GX Hex Fiend (any Hex Editor will do) https://hexfiend.com OpenEmu (best emulator choice if you are on a Mac) https://openemu.org MultiPatch (best patching utility if you are on a Mac) https://projects.sappharad.com/multipatch/ Sega Genesis Mega Drive ROM Analyzer (great for reviewing header info) https://www.romhacking.net/utilities/1344/ Sublime Text (any good text editor to edit TileMolester XML or similar files) https://www.sublimetext.com More Please! Got any advice, tips, tricks, or other insights that you're willing to share? Please leave a post below!
-
How-to: Use the Hacks in Adam Catalyst’s ROMs (NHL '94)
AdamCatalyst replied to AdamCatalyst's topic in How-To & Reference
Default Settings (v24.1.0 / 2023 12 01) Menu Defaults Reference: https://forum.nhl94.com/index.php?/topic/67-how-to-change-menu-defaults/ Home Team @ 0x017C92 Original (Team #12: MTL) 000B Revised (Team #29: VGK) 001D Visitor Team @ 0x017C94 Original (Team #11: LAK) 000A Revised (Team #13: FLA) 000C Period Length @ 0x017C96 Original (Option #2: 10 Minutes) 0001 Revised (Option #1: 5 Minutes) 0000 Penalties @ 0x017C9C Original (Option #1: OFF) 0000 Revised (Option #2: ON) 0001 Line Changes @ 0x017C9E Original (Option #2: OFF) 0001 Revised (Option #1: ON) 0000 Playoff Matchups I actually used NOSE to set the Playoff matchups. So I’m not including any hacking notes on that here. -
How-to: Bench & Crowd Animation + More (NHL ’94)
AdamCatalyst replied to AdamCatalyst's topic in How-To & Reference
Merry Christmas to all the NHL '94 modders out there! Here are my incomplete notes on modifying the animation. I haven’t had a chance to test all this, so please let me know if you spot any errors. And if you have anything you can add or share, please do, and I will try to update the main post with a link-back to you. Looking forward to what you all have cooking for the coming New Year. cheers, -Adam -
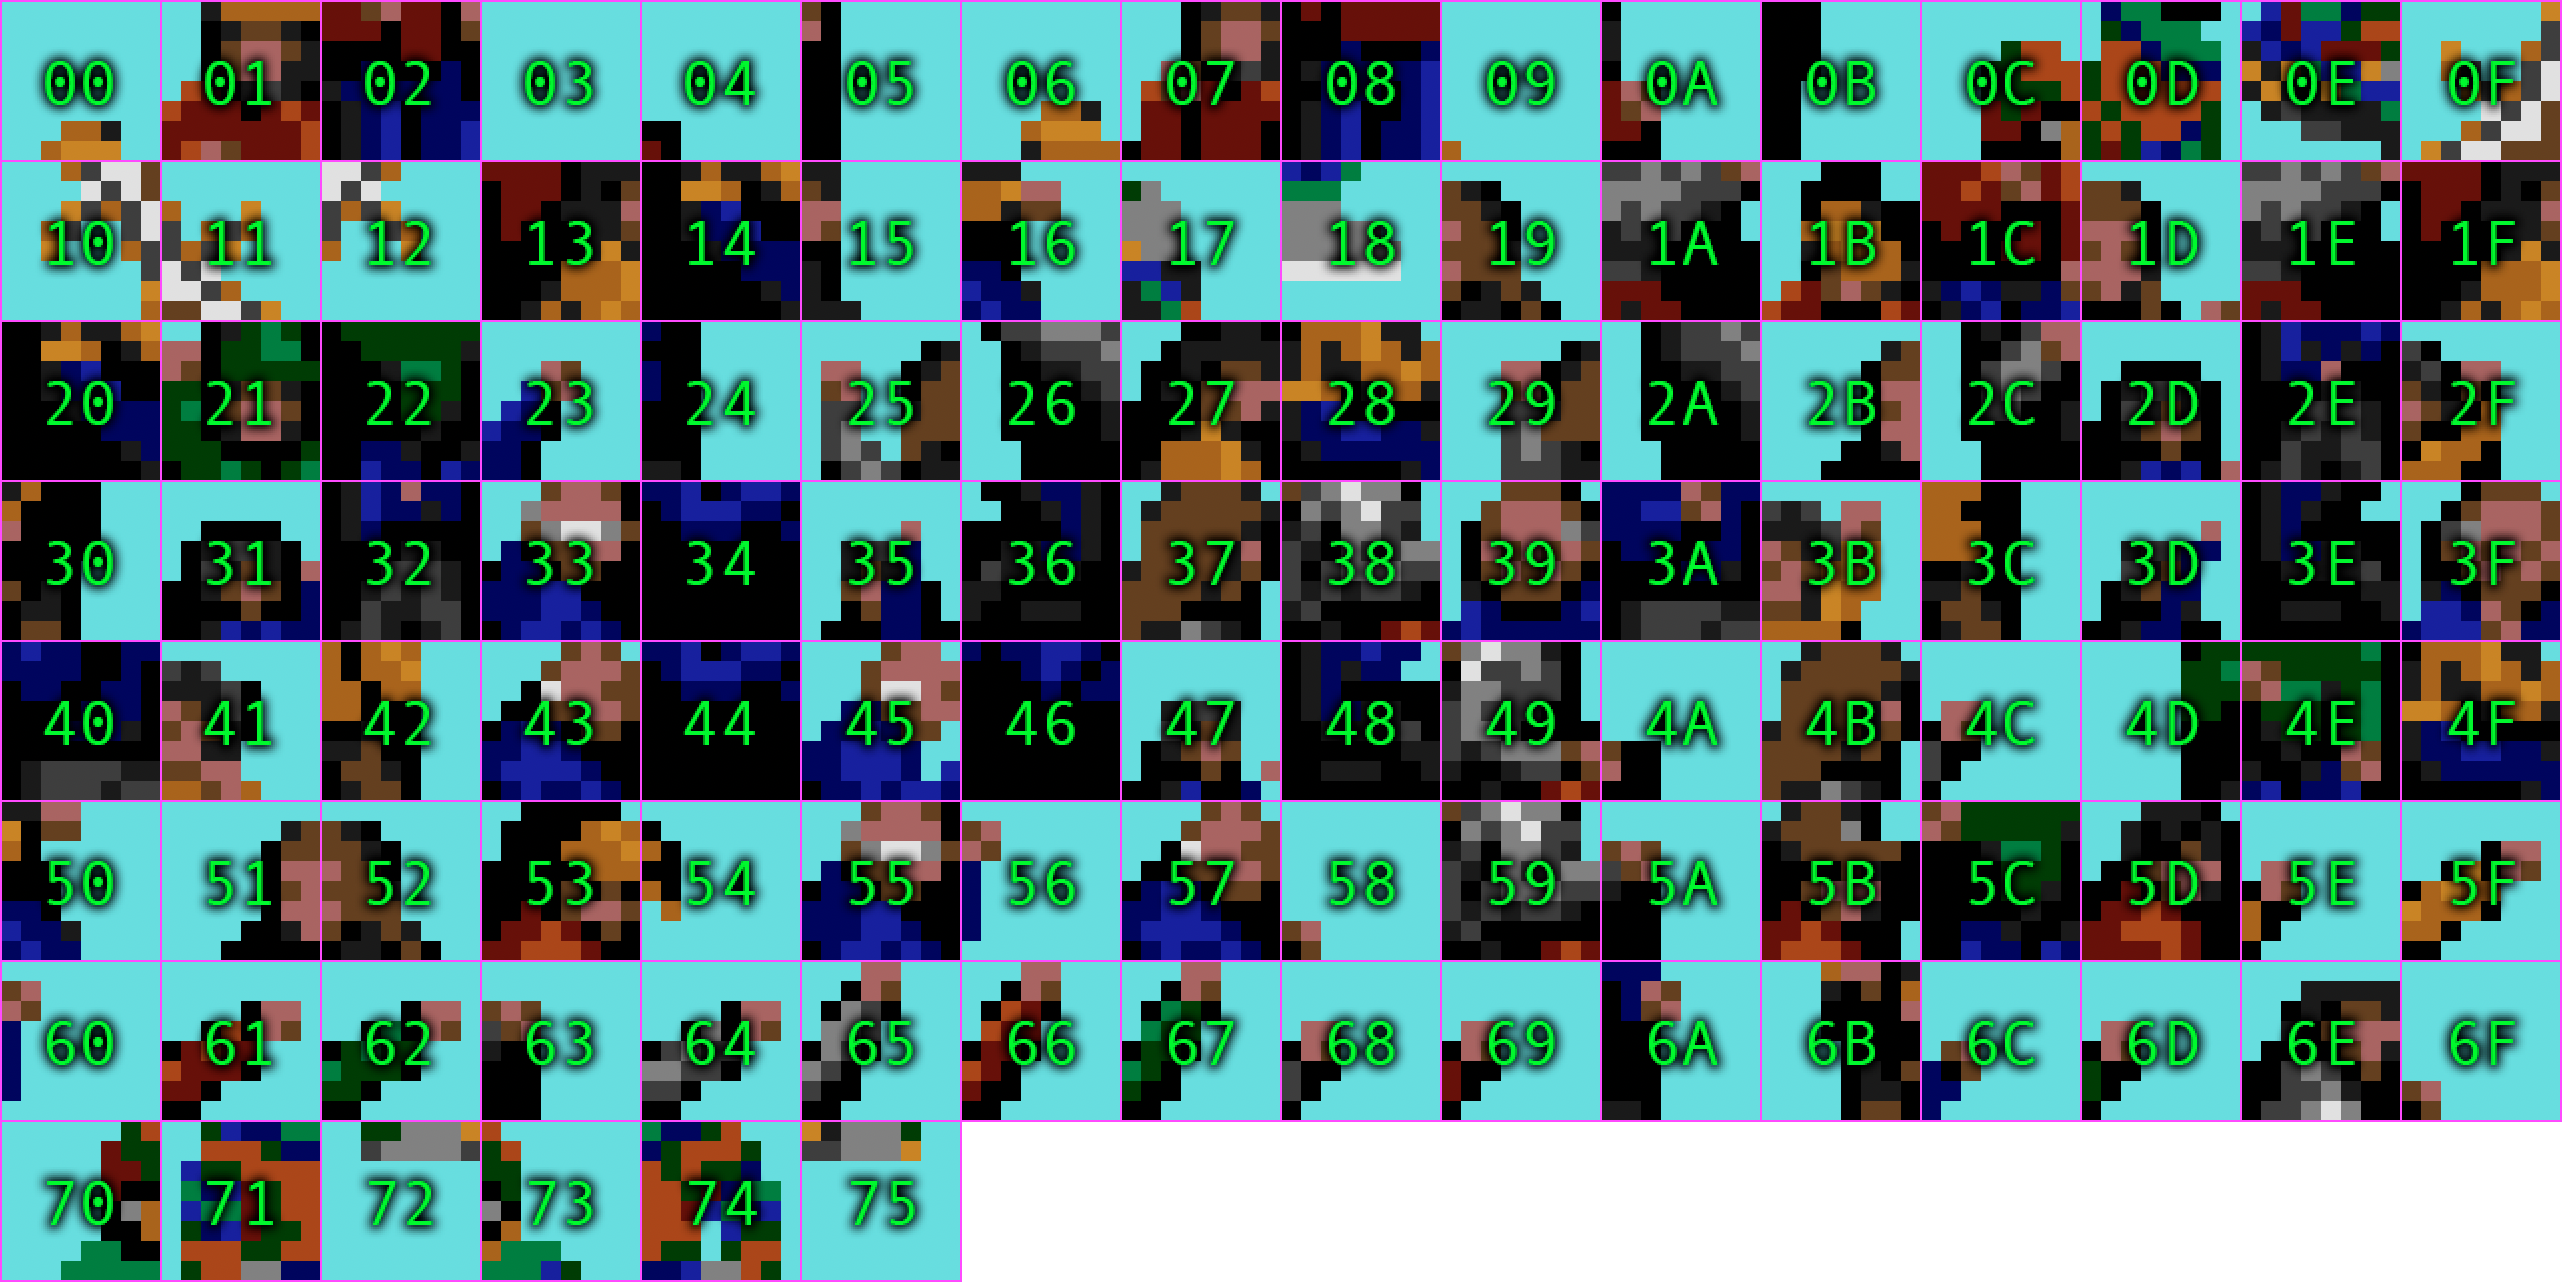
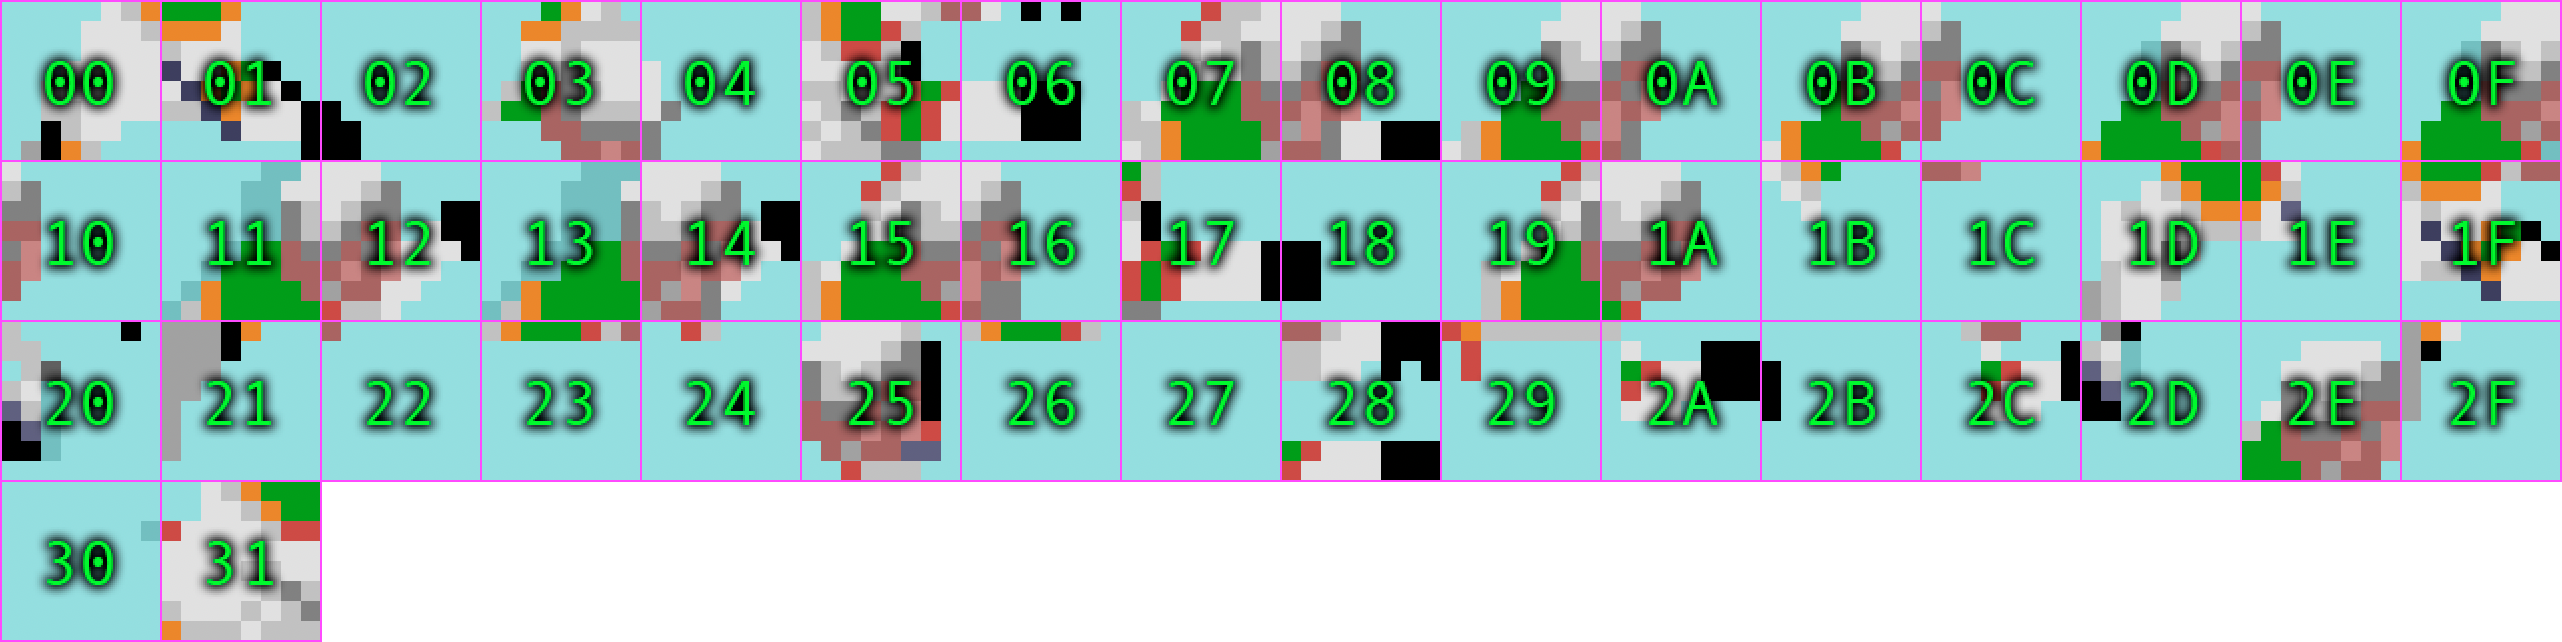
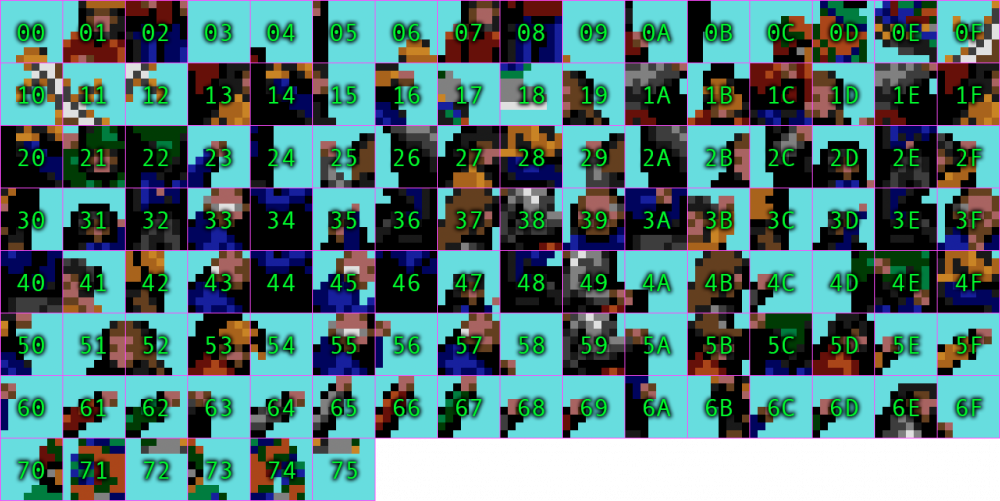
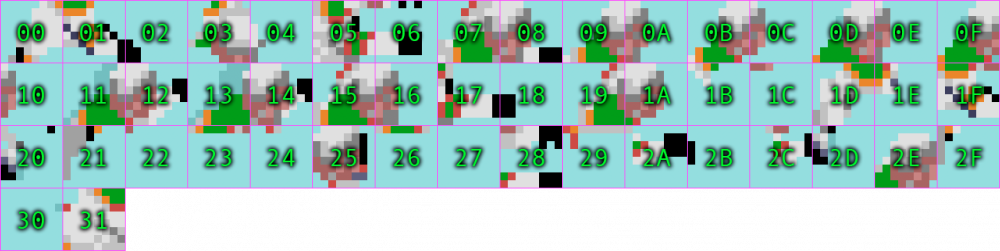
How-to: Bench & Crowd Animation + More (NHL ’94) Various background elements such as the Benches & and the Crowd are appear animated. These animated “frames” are actually tiles specified as overlays over the static background. The animation effects is achieved by cycling through these “frames”. You can edit this in two key ways: Edit the tiles used in these animations. Edit the animation instructions that reference these tiles. 1. Editing the Animation Tiles Editing the Animation Tiles follows the same basic logic as other tile based elements in the ROM. There are two additional considerations when editing tiles to be used in animation. Animated tiles are placed in 1 pixel increments, not the 1-tile (8-pixel) increments of the backgrounds. This allows for more flexibility in how they are designed, as one animation tile can overlap multiple background tiles. Animated tiles can (and typically do) more readily make use of the transparent pixel colour, since they already have a static background. 2. Editing the Animation “Frames” The Animations appears to cycle through a sequence of frames, which in turn reference which tile(s) to use, etc. Each frame is specified as an 8-byte entry. Byte 1–2 = X-Position, in pixels. (Depending on how you measure this, you may need to add +4) Byte 3–4 = Y-Position, in pixels. Byte 5-6 = Tile Row & Column. Byte 7 = Palette & Horizontal Flip Byte 8 = Tile Allocation (as per @kingraph) ## Tiles (width x height) 00 1x1 01 1x2 02 1x3 03 1x4 04 2x1 05 2x2 06 2x3 07 2x4 08 3x1 09 3x2 0A 3x3 0B 3x4 0C 4x1 0D 4x2 0E 4x3 0F 4x4 So, for instance, take the following entry @ 0xA5CC6: 0028 0018 0065 2000 This breaks down to 40 pixels down, 24 pixels across, use the Tile in Row 6, Column 5, with colour Palette #2, and only use a 1x1 block. If you aren’t already familiar with the syntax used for specifying tiles, check out this thread here. References Here are some of the key areas of animation tiles that you might want to edit. I have included PNGs of the original tiles used in NHL '94, as well as downloaded Photoshop files that you can put your custom tiles into. Audience Animations #1: Multiple These are the tiles used for most Audience Animations. This also includes flashes from the audience, as well all tiles that are used for players in the penalty box, in both Rink & Sideboards views. Audience - Animation 1 - Index 10x.psd Audience Animation #1 Tiles 0xA4B5E to 0xA5A1E Unknown 0xA5A1E to 0xA5B1E Audience Animation #1 Frames 0xA5B1E to 0xA78AE Audience Animations #2: Vocalizing These are the tiles used for when Audience members are vocalizing. Audience - Animation 2 (Vocalizing) - Index 10x.psd Audience Animation #2 Tiles 0x0EB820 to 0x0EBE60 Unknown 0x0EBE60 to 0x0EBEF4 Audience Animation #2 Frames 0x0EBEF4 to 0x0EC284 Audience Animation #3: Walking These tiles are used in the animation that plays in the north-end audience, where audience members walk and sit down. Audience - Animation 3 (Walking) 16 - Index 10x.psd Audience Animation #2 Tiles 0x0EC284 to 0x0EC7EE Unknown 0x0EC7EE to 0x0EC8A0 Audience Animation #2 Frames 0x0EC8A0 to 0x0ED180 Bench Animation These are the tiles used on the Bench Area. Rink - Bench - Animation 16 - Index 10x.psd Bench Animation Tiles 0x0ED1BA to 0x0ED7FA Unknown 0x0ED7FA to 0x0EDE8A Bench Animation Frames 0x00ED1BA to 0x0ED1B0 Credits Huge shoutout to @Jkline3, @von Ozbourne, and @kingraph who all helped with these findings! Thank-you guys, I couldn't have figured this stuff out without you.
16-Index20x.thumb.png.843c59c3cc29e8ef6b504019fcca1693.png)
16-Index10x.thumb.png.e969fda5c0d9a979cd215c24bb7150b2.png)
-
How-to: Use the Hacks in Adam Catalyst’s ROMs (NHL '94)
AdamCatalyst replied to AdamCatalyst's topic in How-To & Reference
Sideboards View Players in the Penalty Box (v24.1.0 / 2023 12 01) With the fixes to the Rink view of the visitors players in the penalty box, the Sideboards view of the same will now be inconsistent. Here is how to fix that, again modelled on the un-broken view in ’92. These fixes along with some optional visual adjustments, are provided below, and labelled as follows. Fixes In the Sideboards view, change the order of the Visitors players entering the penalty box to left to right (like in ’92) in order to be consistent with the revised/restored Rink view. Revisions Adjust the spacing of the players in the Penalty Box. Horizontally flip the third player to enter the box for each team. Visitors, 1st Player in Box (Sideboards view) @ 0xA787E Original 005A 008F 0070 6006 Revised 0037 008F 0070 6006 Visitors, 2nd Player in Box (Sideboards view) @ 0xA7886 Original 0047 008F 0070 6006 Revised 0048 008F 0070 6006 Visitors, 3rd Player in Box (Sideboards view) @ 0xA788E Original 0036 008F 0070 6006 Revised 0059 008F 0070 6806 Home, 1st Player in Box (Sideboards view) 0xA7896 Original 0096 008F 0070 4006 Revised 0097 008F 0070 4006 Home, 2nd Player in Box (Sideboards view) @ 0xA789E Original 00A5 008F 0070 4006 Revised 00A8 008F 0070 4006 Home, 3rd Player in Box (Sideboards view) @ 0xA78A6 Original 00B9 008F 0070 4006 Revised 00B9 008F 0070 4806 -
How-to: Use the Hacks in Adam Catalyst’s ROMs (NHL '94)
AdamCatalyst replied to AdamCatalyst's topic in How-To & Reference
Rink View Players in the Penalty Box (v24.2.0 / 2023 12 20) Tiles are referenced using the standard 16 column grid syntax, with 0xA45BE defined as tile 00. Tiles are placed in blocks of multiple sequential tiles. Players are drawn in two blocks each: one block for their legs, and one block for the rest of their body. These Blocks are specified in strings of 8-bytes. There are twelve Blocks in total, starting at 0xA74DE. Here is how to read the 8-byte code for each block. 12 Blocks x 8-bytes each @ 0x0A74DE First Block: 0158 0132 000C 6802 1st two bytes XXXX (0158) X-position (in pixels) 3rd & 4th bytes XXXX (0132) Y-position (in pixels) 5th byte XX (00) Overlay & V-Flip 6th byte XX (0C) Address of First tile used in Block, relative to 0xA45BE 7th byte XX (68) Colour Palette & H-Flip 8th byte XX (02) Number of Tiles included in Block (size of Block) When a player on the Visiting team gets a penalty, in the Rink view the sprite sitting in the penalty box as the wrong Home team coloured legs. This is an easy fix: https://forum.nhl94.com/index.php?/topic/19891-penalty-box-sprites/ When more than one Visitors players end up in the penalty box they overlap incorrectly, as documented in the perfectly named Heads In Asses post. https://forum.nhl94.com/index.php?/topic/20088-heads-in-asses/ The Home team does not have this problem, nor did this problem exist in the ’92 version. This fix restores the un-broken ’92 way of arranging the players in the penalty box. These fixes along with some optional visual adjustments, are provided below, and labelled as follows. Fixed In Rink view, change the order of the Visitors Players entering the penalty box from top to bottom (like in /92) in order to overlap properly. Correct the colour palette of the Visitors teams legs in Rink view. Revised Adjust the placement and staggering of the players in the penalty box in Rink view. Visitors, 1st Player in Box (Rink view) @ 0x0A74DE / 0x0A74E6 Original 0158 0132 000C 6802 0150 0142 0017 4801 Fixed 0158 0132 000C 6802 0150 0142 0017 6801 Fixed + Revised 0157 011F 000C 6802 014F 012E 0017 6801 Visitors, 2nd Player in Box (Rink view) @ 0x0A74EE / 0x0A74F6 Original 0158 0127 000C 6802 0150 0137 0017 4801 Fixed 0158 0127 000C 6802 0150 0137 0017 6801 Fixed + Revised 0158 0128 000C 6802 0150 0137 0017 6801 Visitors, 3rd Player in Box (Rink view) @ 0x0A74FE / 0x0A7506 Original 0157 011E 000C 6802 014F 012E 0017 4801 Fixed 0157 0131 000C 6802 014F 0140 0017 6801 Home, 1st Player in Box (Rink view) @ 0x0A750E / 0x0A7516 Original 0158 0178 000C 4802 0150 0187 0017 4801 Revised 0157 0179 000C 4802 014F 0188 0017 4801 Home, 2nd Player in Box (Rink view) @ 0x0A751E / 0x0A7526 Original 0158 0180 000C 4802 0150 0190 0017 4801 Revised 0158 0181 000C 4802 0150 0190 0017 4801 Home, 3rd Player in Box (Rink view) @ 0x0A752E / 0x0A7536 Original 0158 018A 000C 4802 0150 019A 0017 4801 Revised 0157 0189 000C 4802 014F 0198 0017 4801 -
How-to: Use the Hacks in Adam Catalyst’s ROMs (NHL '94)
AdamCatalyst replied to AdamCatalyst's topic in How-To & Reference
Penalty Names (v24.1.0 / 2023 12 01) The syntax for Penalty Calls is: 1-byte: Fade-in Delay 1-byte: Penalty Duration 2-bytes: Infraction Name Length (x) +2 x-bytes: Infraction Name y-bytes: Referee Animation 2-bytes: Unknown (FEFF) For each penalty (except for instigator) there are two entries, with the only difference being the penalty length, which is always FF for the second entry. I don’t know what this does. The animation is specified by referencing the frames to be used for the Referee’s call. Most penalties show a two frame animation of the referee call sign, repeated a few times. Holding & Interference use a single held frame. You can mix and match and drop different animation frames for different penalties. You can also drop animation frames in increments of 2-bytes in order to make room for more text. If you do this, make sure that you update the Infraction Name Length byte. “Cross-checking” Penalty Name The name of the penalty is “Cross-checking”, not “Cross Check” as it is specified in the game. This changes the name, and drops an animation frame in order to compensate. Cross-checking 1/2 (fade-in / duration / text length / text content / animation frames) @ 0x019040 Original (“Cross Check”) 04 02 000E 43726F737320436865636B00 0004 0601 0F01 1001 0F01 1001 0F01 1001 0F01 1001 FEFF Revised (“Cross-checking”) 04 02 0010 43726F73732D636865636B696E67 0004 0601 0F01 1001 0F01 1001 0F01 1001 0F01 FEFF Cross-checking 2/2 (fade-in / duration / text length / text content / animation) @ 0x019066 Original (“Cross Check”) 04 FF 000E 43726F737320436865636B00 0004 0601 0F01 1001 0F01 1001 0F01 1001 0F01 1001 FEFF Revised (“Cross-checking”) 04 FF 0010 43726F73732D636865636B696E67 0004 0601 0F01 1001 0F01 1001 0F01 1001 0F01 FEFF “Instigator” Penalty Name The name of the penalty is “Instigator”, not “Fight Instigator” as it is specified in the game. Regardless, this change is most likely useless, since fighting is disabled in ’94. Instigator (fade-in / duration / text length / text content / animation) @ 0x19112 Original (“Fight Instigator”) 28 02 0012 466967687420496E7374696761746F72 0004 0D01 0E01 0D01 0E01 0D01 0E01 0D01 0E01 FEFF Revised (“Instigator”) 28 02 000C 496E7374696761746F72 0004 0D01 0E01 0D01 0E01 0D01 0E01 0D01 0E01 FEFF FFFF FFFF FFFF -
Process to Change Palettes on Sprites - My Notes
AdamCatalyst replied to kingraph's topic in Sega Hacking Projects
I never would have thought of doing this. Thanks for sharing your thinking on all this! -
You should do it!
-
How-to: Use the Hacks in Adam Catalyst’s ROMs (NHL '94)
AdamCatalyst replied to AdamCatalyst's topic in How-To & Reference
Goal Overlays (v24.2.0 / 2023 12 20) The first item is the Goal “Clear” box. This is the area of overlays that are erased once the type of goal overlay has been shown for x seconds. You will need to adjust this if you enlarge any of the Goal boxes. Goal Clear Box @ 0x18A5D (X-axis / Y-axis / unknown / unknown / Width) Original 0B02 0070 13 Revised 0A02 0070 15 “Goal!” Box @ 0x188D1 (X-axis / Y-axis / unknown / unknown / Width) Original 0B02 0070 13 Revised 0A02 0070 15 Text Heading “GOALl!” @ 0x18A17 (X-axis / Y-axis / Text) Original 0F 0347 4F41 4C21 Revised (“GOAL” centred) 10… Text Heading “PP GOALl!” @ 0x18A37 (X-axis / Y-axis / Text) Original 0D 03 5050 2047 4F41 4C21 Revised (centred) 0E… Text Heading “HAT TRICK!” @ 0x18A25 & 0x18A47 (X-axis / Y-axis / Text) Original 0D 03 4841 5420 5452 4943 4B21 Revised (centred) 0C… Goal Scorer (X-Axis) @ 0x1897D Original 0C Revised 0D Text Heading “Assist by:” @ 0x189C1 (X-axis / Y-axis / Text) Original 0E06 4173 7369 7374 2062 793A Revised (“assist by” centred) 1006 6173 7369 7374 2062 7920 Assist #1 (X-Axis / Y-Axis) @ 0x189CE 0C07 Assist #2 (X-Axis / Y-Axis) @ 0x189F3 0C08 -
How-to: Use the Hacks in Adam Catalyst’s ROMs (NHL '94)
AdamCatalyst replied to AdamCatalyst's topic in How-To & Reference
Injury Overlays (v24.2.0 / 2024 12 20) Injury Text Box (X-axis / Y-axis / unknown / unknown / Width) @ 0x018727 Original 0B 03 00 70 12 Revised 0A 03 00 70 14 Period Length Injuries Text: “Injury to:” (PERIOD) @ 0x018743 (X-axis / Y-axis / Text) Original 0C04 496E 6A75 7279 2074 6F3A Revised (“-INJURY-”) 1104 2D49 4E4A 5552 592D IMPORTANT This shortens the heading by two bytes. We will use the extra bytes next. Text: “Out for period” @ 0x01874E (X-axis / Y-axis / Text) Original “Out for period” 0C 06 4F75 7420 666F 7220 7065 7269 6F64 Revised 0D 06 6F75 7420 7468 6973 2070 6572 696F 6420 IMPORTANT The lengthens the text by two bytes, and must be used with a hack that frees up bytes. Text: Injured Player Name (PERIOD) @ 0x018761 (X-axis / Y-axis) Original 0C 05 Revised 0D 05 Game Length Injuries Text: “Injury to:” (GAME) @ 0x01876F (X-axis / Y-axis / Text) Original 0C04 496E 6A75 7279 2074 6F3A Revised (“-INJURY-”) 1104 2D49 4E4A 5552 592D IMPORTANT This shortens the heading by two bytes. We will use the extra bytes next. Text: “Out for game” @ 0x01877C (X-axis / Y-axis / text) Original 0C06 4F75 7420 666F 7220 6761 6D65 Revised “out this game” 0D06 6F75 7420 7468 6973 2067 616D 6520 IMPORTANT The lengthens the text by two bytes, and must be used with a hack that frees up bytes. Injured Player Name (GAME) @ 0x01878B (X-axis / Y-axis) Original 0C 05 Revised 0D 05 -
How-to: Use the Hacks in Adam Catalyst’s ROMs (NHL '94)
AdamCatalyst replied to AdamCatalyst's topic in How-To & Reference
Penalty Shot & Shoot-Out Overlays (v24.2.0 / 2023 12 20) Clear Box for Penalty Shot & Shoot-Out The first item is the Penalty Shot & Shoot-Out “Clear” box. This is the area of Overlays that are erased once the type of Penalty-Shot or Shoot-Out overlay has been shown for x seconds. You may want to adjust this if you enlarge the Penalty Shot or Shoot-Out box. On a personal note, this took me ~500 ROM variations, hunting for this variable, using a brute-force binary method. I was home sick, and had nothing else going on. X-axis / Y-axis / unknown / unknown / width @ 0x1203D Original 0302 0070 1B Revised 0202 0070 1C Penalty Shot Overlay Box X-axis / Y-axis / unknown / unknown / width @ 0x187E3 Original 0302 0070 1B Revised 0202 0070 1V Shoot-Out Overlay Box Left Edge / Top Edge / unknown / unknown / Right Edge / unknown /Bottom Edge @ 0xFC337 Original 0302 0070 1B 72 0C Revised 0602 0070 14 72 0C Text Content Text: “vs.” @ 0xFC38B 7673 2E to 7673 20 (“vs.” to “vs”) Second Player Name Position (X/Y) @ 0xFC38F 0407 to 080B First Team (Home) Name & Score (X/Y) @ 0xFC3CF 0409 to 041C (below the bottom of the screen) First Team (Home) Name Position (X/Y) @ 0xFC3D6 C6CE First Team (Home) Score Position (X/Y) @ 0xFC3EF D574 Second Team (Visitor) Name & Score Position (X/Y) @ 0xFC409 040A to 041C (below the bottom of the screen) Second Team (Visitor) Name Position (X/Y) @ 0xFC410 CA32 Second Team (Visitor) Score Position (X/Y) @ 0xFC429 D576 Round Number Position (X/Y) @ 0xFC443 040C to 0C07 Heading Text “SHOOTOUT MODE” (X / Y / Content) @ 0xFC469 Original 0403 5348 4F4F 544F 5554 204D 4F44 45 ("SHOOTOUT MODE" Revised 0804 5348 4F4F 544F 5554 0000 0000 00 (“SHOOTOUT”) First Player Name Position (X/Y) @ 0xFC479 0405 to 0809 End of Shoot-Out End of Shoot-Out Box Position (X/Y) @ 0xFC5BB 010D to 000D Width @ 0xFC5C5 1E to 20 End of Shoot-Out Text: "SHOOTOUT WON BY" (X / Y / Content) @ 0xFC5D5 020E 5348 4F4F 544F 5554 2057 4F4E 2042 59 End of Shoot-Out Winning Team Name Position (X-Axis) @ 0xFC611 02 -
How-to: Use the Hacks in Adam Catalyst’s ROMs (NHL '94)
AdamCatalyst replied to AdamCatalyst's topic in How-To & Reference
Timer Clock, Score Clock, & Line-Change Overlays (v24.1.0 / 2023 12 01) Timer Clock The Time Clock is not modified in my ROM, but the info is included for reference. Clock Window Position (X/Y) @ 0x012C29 0017 Width @ 0x12C2D 09 Height @ 0x12C2F 05 Clock Text: Period Position (X/Y) @ 0x012C41 0118 Clock: Graphic (EA Logo) Position (X/Y) @ 0x012D81 0119 Clock: Power Play Team Initials Position (X/Y) @ 0x012B1D 0119 Clock: Power Play Text Position (X/Y) @ 0x012AEF 0119 Clock: Power Play Time Position (X/Y) @ 0x012AF9 011A Score Clock Score Window X-position 0x012C7B 17 to 18 (1 tile to the right) Home Team Initials Position (X/Y) @ 0x012C8D 181A to 191A (1 tile to the right) Visitor Team Initials Position (X/Y) @ 0x012C9F 1818 to 1918 (1 tile to the right) Scores X-position 0x012D1F 1C to 1D (1 tile to the right) Line Change Overlay X Position 0x0B9E5 16 too 17 (1 tile to the right) -
How-to: Use the Hacks in Adam Catalyst’s ROMs (NHL '94)
AdamCatalyst replied to AdamCatalyst's topic in How-To & Reference
Goalie Hold Time to Whistle (v24.2.0 / 2023 12 20) This delays the time that a Goalie can hold onto the puck, before the play is whistled dead. Time is set by gameplay frames / 60 frames per second. Time until whistle @ 0x1530E Original (2.333 seconds) 008C Revised (2.467 seconds) 0094 References: https://forum.nhl94.com/index.php?/topic/11464-how-to-allow-goalie-to-hold-puck-longer-or-indefinitely/&do=findComment&comment=87600 -
How-to: Use the Hacks in Adam Catalyst’s ROMs (NHL '94)
AdamCatalyst replied to AdamCatalyst's topic in How-To & Reference
Goalie Range of Motion (v24.1.0 / 2023 12 01) These values defines how far the Goaltender can move with and without the puck, as specified in pixels, with Centre Ice specified as 0000. RIGHT Side Limit @ 0xB632 Original (+36) 0024 Revised NA LEFT Side Limit @ 0xB650 Original (-36) FFDC Revised NA Towards Centre Ice Limit for TOP Goaltender @ 0xB66A Original (231) 00E7 Revised (224) 00E0 Towards Centre Ice Limit for BOTTOM Goaltender @ 0xB674 Original (-231) FF19 Revised (-224 pixels) FF20 References: -
Congrats on the newborn! Yes, you’re right about the CSV. I don’t know anything about the Anolog Pocket, but maybe try changing the .bin extension to .md?


16-Index20x.png.15ebc43b0783b69e0d20da712941e16c.png)
16-Index10x.png.2681cef466716d55dffb9b5155f4eb4e.png)