
AdamCatalyst
-
Posts
487 -
Joined
-
Last visited
-
Days Won
64
Content Type
Profiles
Forums
Events
Posts posted by AdamCatalyst
-
-
-
Got it. I can’t help but be drawn to such a challenge. Will review my notes and venture out into the wilderness today over breakfast.
-
6 hours ago, von Ozbourne said:
Now the question is, if it's possible to translate this over to the puck...
Wait, what are you trying to do with the puck?
-
It's unfortunate that the stuff I found offers such limited customization. I had grand ideas of mixing colour palettes, and other things, but haven't been able to get any of my ideas to work or look good within these restrictions. I suspect there is more to discover here, I gave up early on this one, it was not an exhaustive search.
-
How-to: Move & Resize the Net Graphic (NHL '94)
It appears that each Net graphic is arranged in 6 x 4 tile qudarants. So four 48 px by 32 px chunks make up the top net, and four different 48 px by 32 px chunks make up the bottom net.
We already know how to change the colour palette for each quadrant thanks to this post by @clockwise:
In this post I'll show you how to move around these quadrants. Why might you want to do this? Well, you could…
- Relocate the net graphic.
- Shrink it by moving more of it to overlap itself.
- Make the Net(s) match the Rink symmetry. (In case you haven’t noticed, the Nets are an odd number of pixels, in Rink, Crease, etc. made up of an even number of pixels.)
It’s possible that more can be done than this. I was investigating making the Net(s) symmetrical, and once I achieved that, I abandoned this project. I’m posting my notes in case someone else can make use of this, or wants to keep investigating this area of code.
I have included the minor adjustments needed if you want to make the Net symmetry match the Rink symmetry.
Top Net
Top Net: Top Left quadrant
X-position / Y-position
0xA16BB / 0xA16BDOriginal
E8 / E9Symmetrical (1 pixel to the right)
E9 / "
Top Net: Top Right quadrant
X-position / Y-position
0xA16C3 / 0xA16C5Original
FF / E9
Top Net: Bottom Left quadrant
X-position / Y-position
0xA16CB / 0xA16CDOriginal
E6 / F9Symmetrical (1 pixel to the right)
E7 / "
Top Net: Bottom Right quadrant
X-position / Y-position
0xA16D3 / 0xA16D5Original
11 / F9
Bottom Net
Bottom Net: Top Left quadrant
X-position / Y-position
0xA16DB / 0xA16DDOriginal
E8 / E6Symmetrical (1 pixel to the right)
E9 / "
Bottom Net: Top Right quadrant
X-position / Y-position
0xA16E3 / 0xA16E5Original
FF / E6
Bottom Net: Bottom Left quadrant
X-position / Y-position
0xA16EB / 0xA16EDOriginal
F8 / E4Symmetrical (1 pixel to the right)
F9 / "
Bottom Net: Bottom Right quadrant
Sorry, I never got this far. If anyone else figures this out, let me know and I will update it here.
-
Thanks man!!! This is exactly the kind of tip I was hoping to corral. So many great ideas out there. I updated the Tips post to quote you, and link back to your visual examples. Thanks again!
-
OK, so the other night, my fiancee and I are sitting on the couch, trying to figure out what to do…
Me: "Hey, you still haven't played my NHL ROM! Do you want to give it a try now?"
Her: "Sure!"
Me: "Do you want to play as teammates or against eachother. I suggest we play as…"
Her: "NO! I want to play against you."
Me. "OK, what team do you want? I suggest Edmonton. Playing as McDavid is…"
Her: "I need to check out their uniforms first."
She goes on her laptop, presumably to Google images, and suddenly exclaims:
Her: "Philadelphia!!! I love the black and orange, it looks so cool!"
Me: "Really? You should check out Anaheim, they have more black on the uniforms, you might like that."
Her: "No! They look cheap and tacky."
So I get it set it up on the TV, she is PHI at home (I'm ANA), and when the opening face-off screen comes up, she starts exclaiming again.
Her: "NO! The Philadelphia uniforms are wrong! They should be BLACK! I don't like this!"
Me: "OH! You saw their third jerseys! Right. Sorry honey, I only used the standard jerseys in my ROM."
Her: "You should add in the third jerseys too!"
Me: Slaps forehead.
After the puck drop, I quickly discovered that me taking Anaheim was a bad idea. The colours were too similar to Philly for her, and she kept getting confused. She eventually found her niche being the goaltender as much as possible. However, despite my numerous explanations, she couldn't understand why she kept getting a whistle when she tried to skate with puck up the ice with her goalie,
After our 5-minute scrimmage she agrees to play as teammates with Edmonton. It was fun. The highlight was setting her up for a one-timer that went in. I was more excited than her! Unfortunately we still lost. She finally understood that she had to pass it as the goalie in order to avoid the whistle. This led to countless own goals, as she would frantically pass it into her net. It's hard to defend against that.
Tonight I'll show her your latest ROMs. I look forward to her telling me how much she likes these ones better, and how you "get it" about the uniforms.
-
 4
4
-
-
On 12/20/2016 at 12:55 PM, CoachMac said:
This bugs me.
What happened?
Did Pro-Set pull the ad? Go out of Business?
No other Sponsor could be found?
Weird that it was just left blank.
Why did they not re-center the other stuff.
[…]
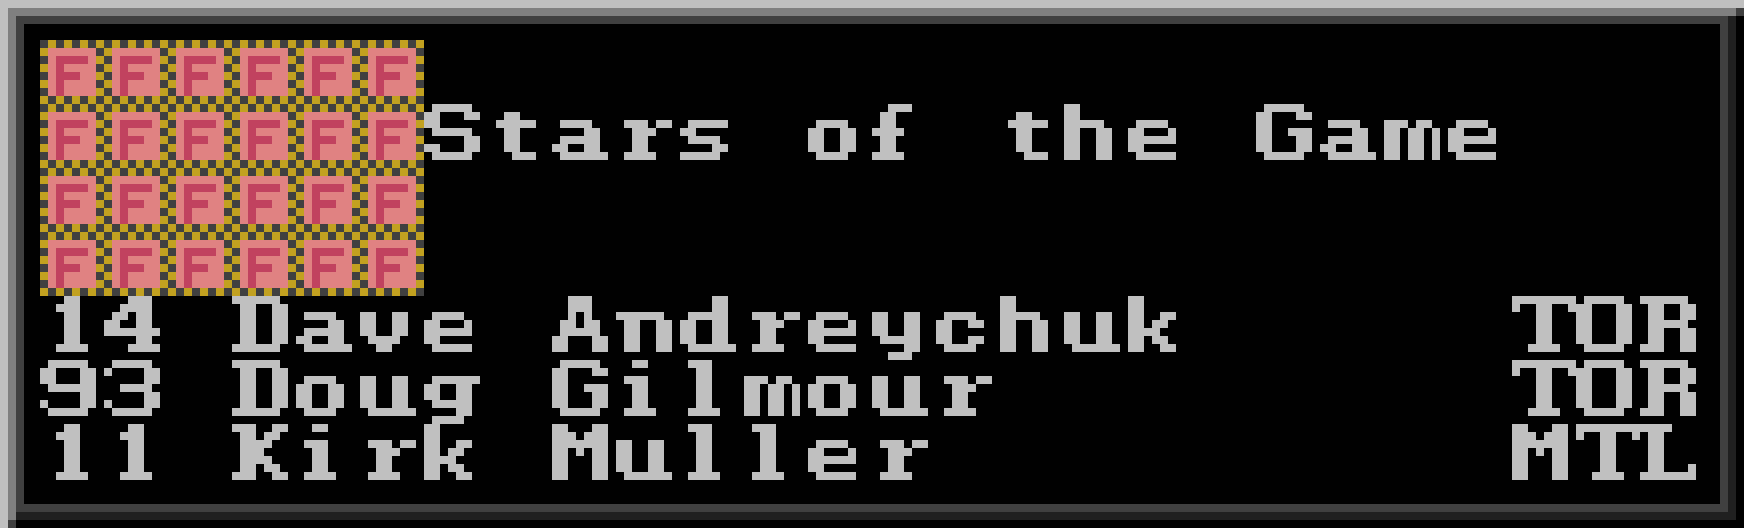
NHL 94 Original 3 Stars (with the weird blank spot)

I know this is from five years ago, but in case everyone doesn't know this already, in order to centre the "Stars of the Game" text, change 0x18553 from 09 to 08.
---
p.s. I haven't actually been able to find this in the forums. If this is actually new info, I I'll publish my notes on how to modify the layout of the Stars of the Game.
-
30 minutes ago, von Ozbourne said:
That's a good question. I suppose I should have put together a tutorial and some screenshots…
You don't have to do any of that! Just sharing the idea is useful. Not everyone would ever think of such a thing.
-
 1
1
-
-
8 hours ago, von Ozbourne said:
The only tip I can share is that just like the main menu foreground/background assets, if use palette 4xxx or 6xxx for any tile, it will mimic the home or away uniform colours respectively. So you can have a homer crowd [see @Sean's NCAA games for an example of this], could possibly have a few disturbers intermingled[?] or have the arena painted something other than grey, so it looks more like a different place for every team.
There is SO much unlocked potential with this idea.
Do you mind if I incorporate this under Tips @ Tricks, or would you prefer a link back to your post instead?
-
Thanks man!!!
-
Hey guys, I finally wrote up that post. Well, actually it is a thread. I would love it if you could take a look, and let me know what I'm missing, etc.
-
 1
1
-
-
Next Steps…
When editing the Rink, you might want tor move around some of the tiles that have animation. Here is how you can edit that animation too!
-
How-To Edit the Rink & Sideboards
4. Tips, Tricks, & ResourcesWork Flow
Templates & More
Here is a robust set of PNGs and Photoshop compatible files to get you started. You can update these Photoshop files with your own Layout and Tile Sets, giving you an ongoing reference. I highly recommend that you try using these.
NHL 94 - Rink & Sideboards - Resources - v1.1 2023 04 21.7z
Work in The Matrix
If you set your Hex Editor to be showing 48 columns of 2 bytes groupings (4 digits) at a time, you will be able to more easily navigate the layout in the code. Look at this example below, showing the Instant Replay Overlay, and its Tile Map. In the code you can actually see the cluster of values where the controller overlay appears on the screen. If 48 is too many columns for you, even setting your Hex Editor to 24 or 12 columns wide can still make is easier to navigate.

Specific Areas
The Bottom of the Rink
If you decide to edit the area in the Rink below the bottom net in the Rink, note that some of these tiles are specified as Overlays, so that the Glass & Boards overlap the player Sprites. If you are drawing or editing this area (perhaps adding a Trapezoid line), you will likely have to specify that some Tiles as Backgrounds and some tiles as Overlays in order for it to look right.
Centre Ice Logo
The centre ice logo can be rotated, see @Jkline3 Rotating Centre Ice Logo thread for more details. You can go further than that…
On 4/25/2023 at 8:45 PM, Jkline3 said:…you can do some fun stuff with the center ice logos by combining the "traditional" 6x4 center ice tiles with surrounding tiles. You can enlarge the logo and also use a common palette (second palette is generally most versatile) to create a universal logo for a ROM - international events, tournaments, etc.
[…] The center ice tiles also don't HAVE to be at center ice, they can be moved around and manipulated using the techniques you've outlined above.
Check out @Jkline3 post below where he shares these Centre Ice Logo Customization Tips with visual examples.
Instant Replay Reverse View
The Instant Replay Reverse View uses a different Tile Set from the regular Rink view. While most of these tiles are the same, many are relocated to different addresses, some have been modified, and some don't exist at all. If you do want to keep the Reverse view up-to-date as you modify the Rink, I highly recommend taking the time to make your Regular & Reverse Rink Tile Sets as identical as possible, with the differences being in the Tile Map code. This is a big time investment at first, but in the long run, it has made maintaining consistency between these two views trivially easy for me.
Colour Considerations
Most of the game is coloured using the first two available palettes, seen on the ice and in the audience respectively. But the Home and Visitor colour palettes can be used in place of them, to all kinds of interesting effects. From @von Ozbourne's posts below:
Quote"
…just like the main menu foreground/background assets, if you use palette 4xxx or 6xxx for any tile, it will mimic the home or away uniform colours respectively. So you can have a home crowd [see @Sean's NCAA games for an example of this], and could possibly have a few disturbers intermingled, or have the arena painted something other than grey, so it looks more like a different place for every team.
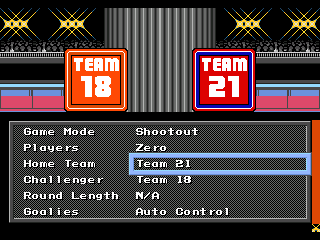

In the proof of concept above, note how the background for the menu shifts when a new team is selected.
More Tiles Please
Eventually you will get to a point where you will need to free up some more tiles in order achieve your creative goals. There are a few tiles that you can replace with others, without having an obviously negative effect. There are far more tiles that you could re-claim if you creatively revise some sections of the layout. I highly recommend downloading a bunch of other people's ROM mods, and checking out their Tile Maps to get a sense of what can be changed. There are countless approaches and great ideas out there. Below are some examples from my ROMs.
Top & Bottom of the Rink
Below are excerpts from the top and bottom of the rink, with some suggested tiles that you can free up. On the Left, note the horizontal seam running through the glass. You can remove the tiles used for this seam (along with a unique tile on the ice that isn't necessary) to free up 11 tiles to re-appropriate for other elements (right).
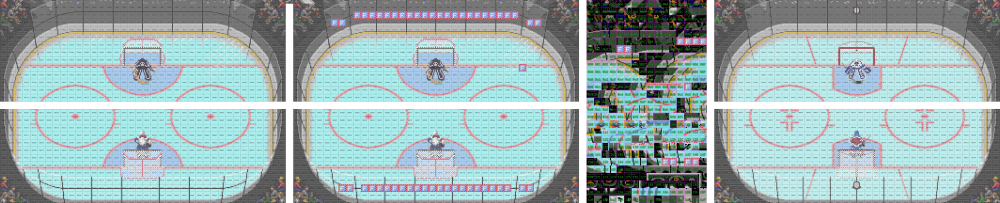
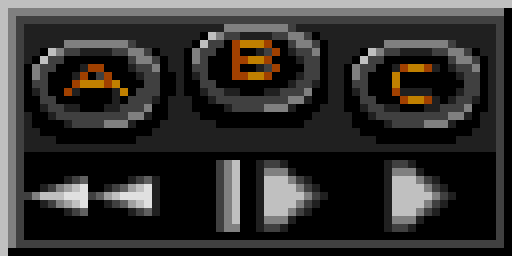
Instant Replay Controls Overlay
Below left is the Instant Replay Controls Overlay, which uses ~30 unique Tiles. Below right is a redesign that uses only 14 Tiles, giving you 16 free tiles.

Flip it Good
Remember that you have the ability to flip tiles, as this can be hugely helpful in creating efficient designs. Below is the NHL logo I drew for the Scoreboard. The logo occupies 14 tiles, but it only utilizes 10 unique tiles in the Tile Set, since the Tile used at 0xBDD4C, 0xBDD8C, 0xBDDCC, and 0xBDE0A reuses tiles and horizontally flips them for efficiency.

References
-
4
-
-
How-To Edit the Rink & Sideboards
3. AdvancedTile Syntax Reference
Once you get the hang of understanding this 2-byte code, all that you will likely need are the references below.
Second, Third, & Fourth Digit
+ 0xxx Tile ReferenceSecond Digit
+ 8 Horizontal FlipFirst Digit
+ 1 Vertical Flip
+ 0,2,4,6 Colour Palette
+ 8 Overlay
Tile Map & Tile Sets Locations
Please note, in each of the diagrams below, I have omitted the addresses for Tiles that caused errors when I modified them. I recommend leaving them as-is.
Sideboards
This is the background used when you start or pause a game.
Tile Map
0xBDB6A to 0xBE268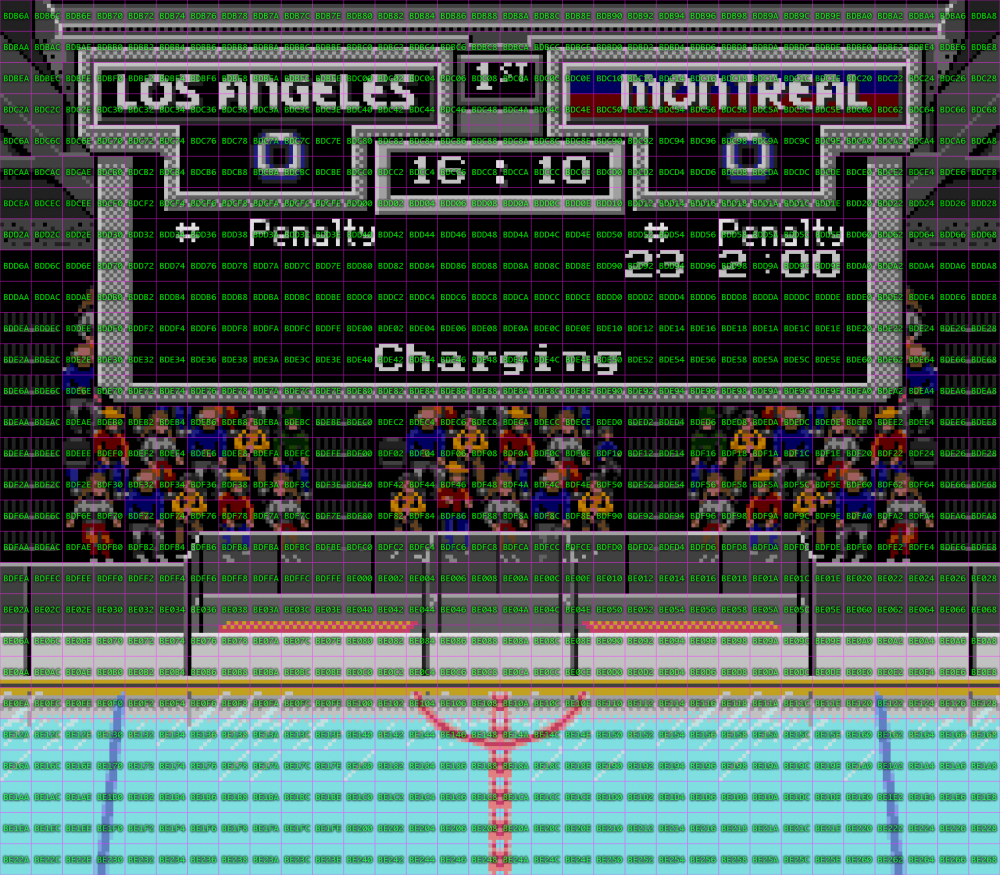
Tile Set
16 Columns x 14 Rows @
0xBC066 (770150 decimal)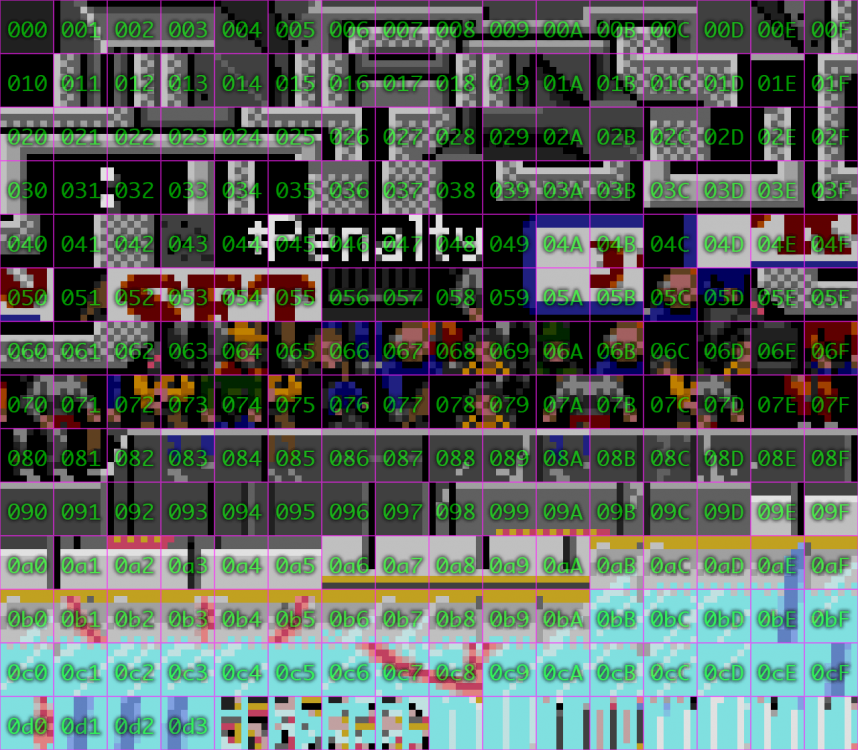
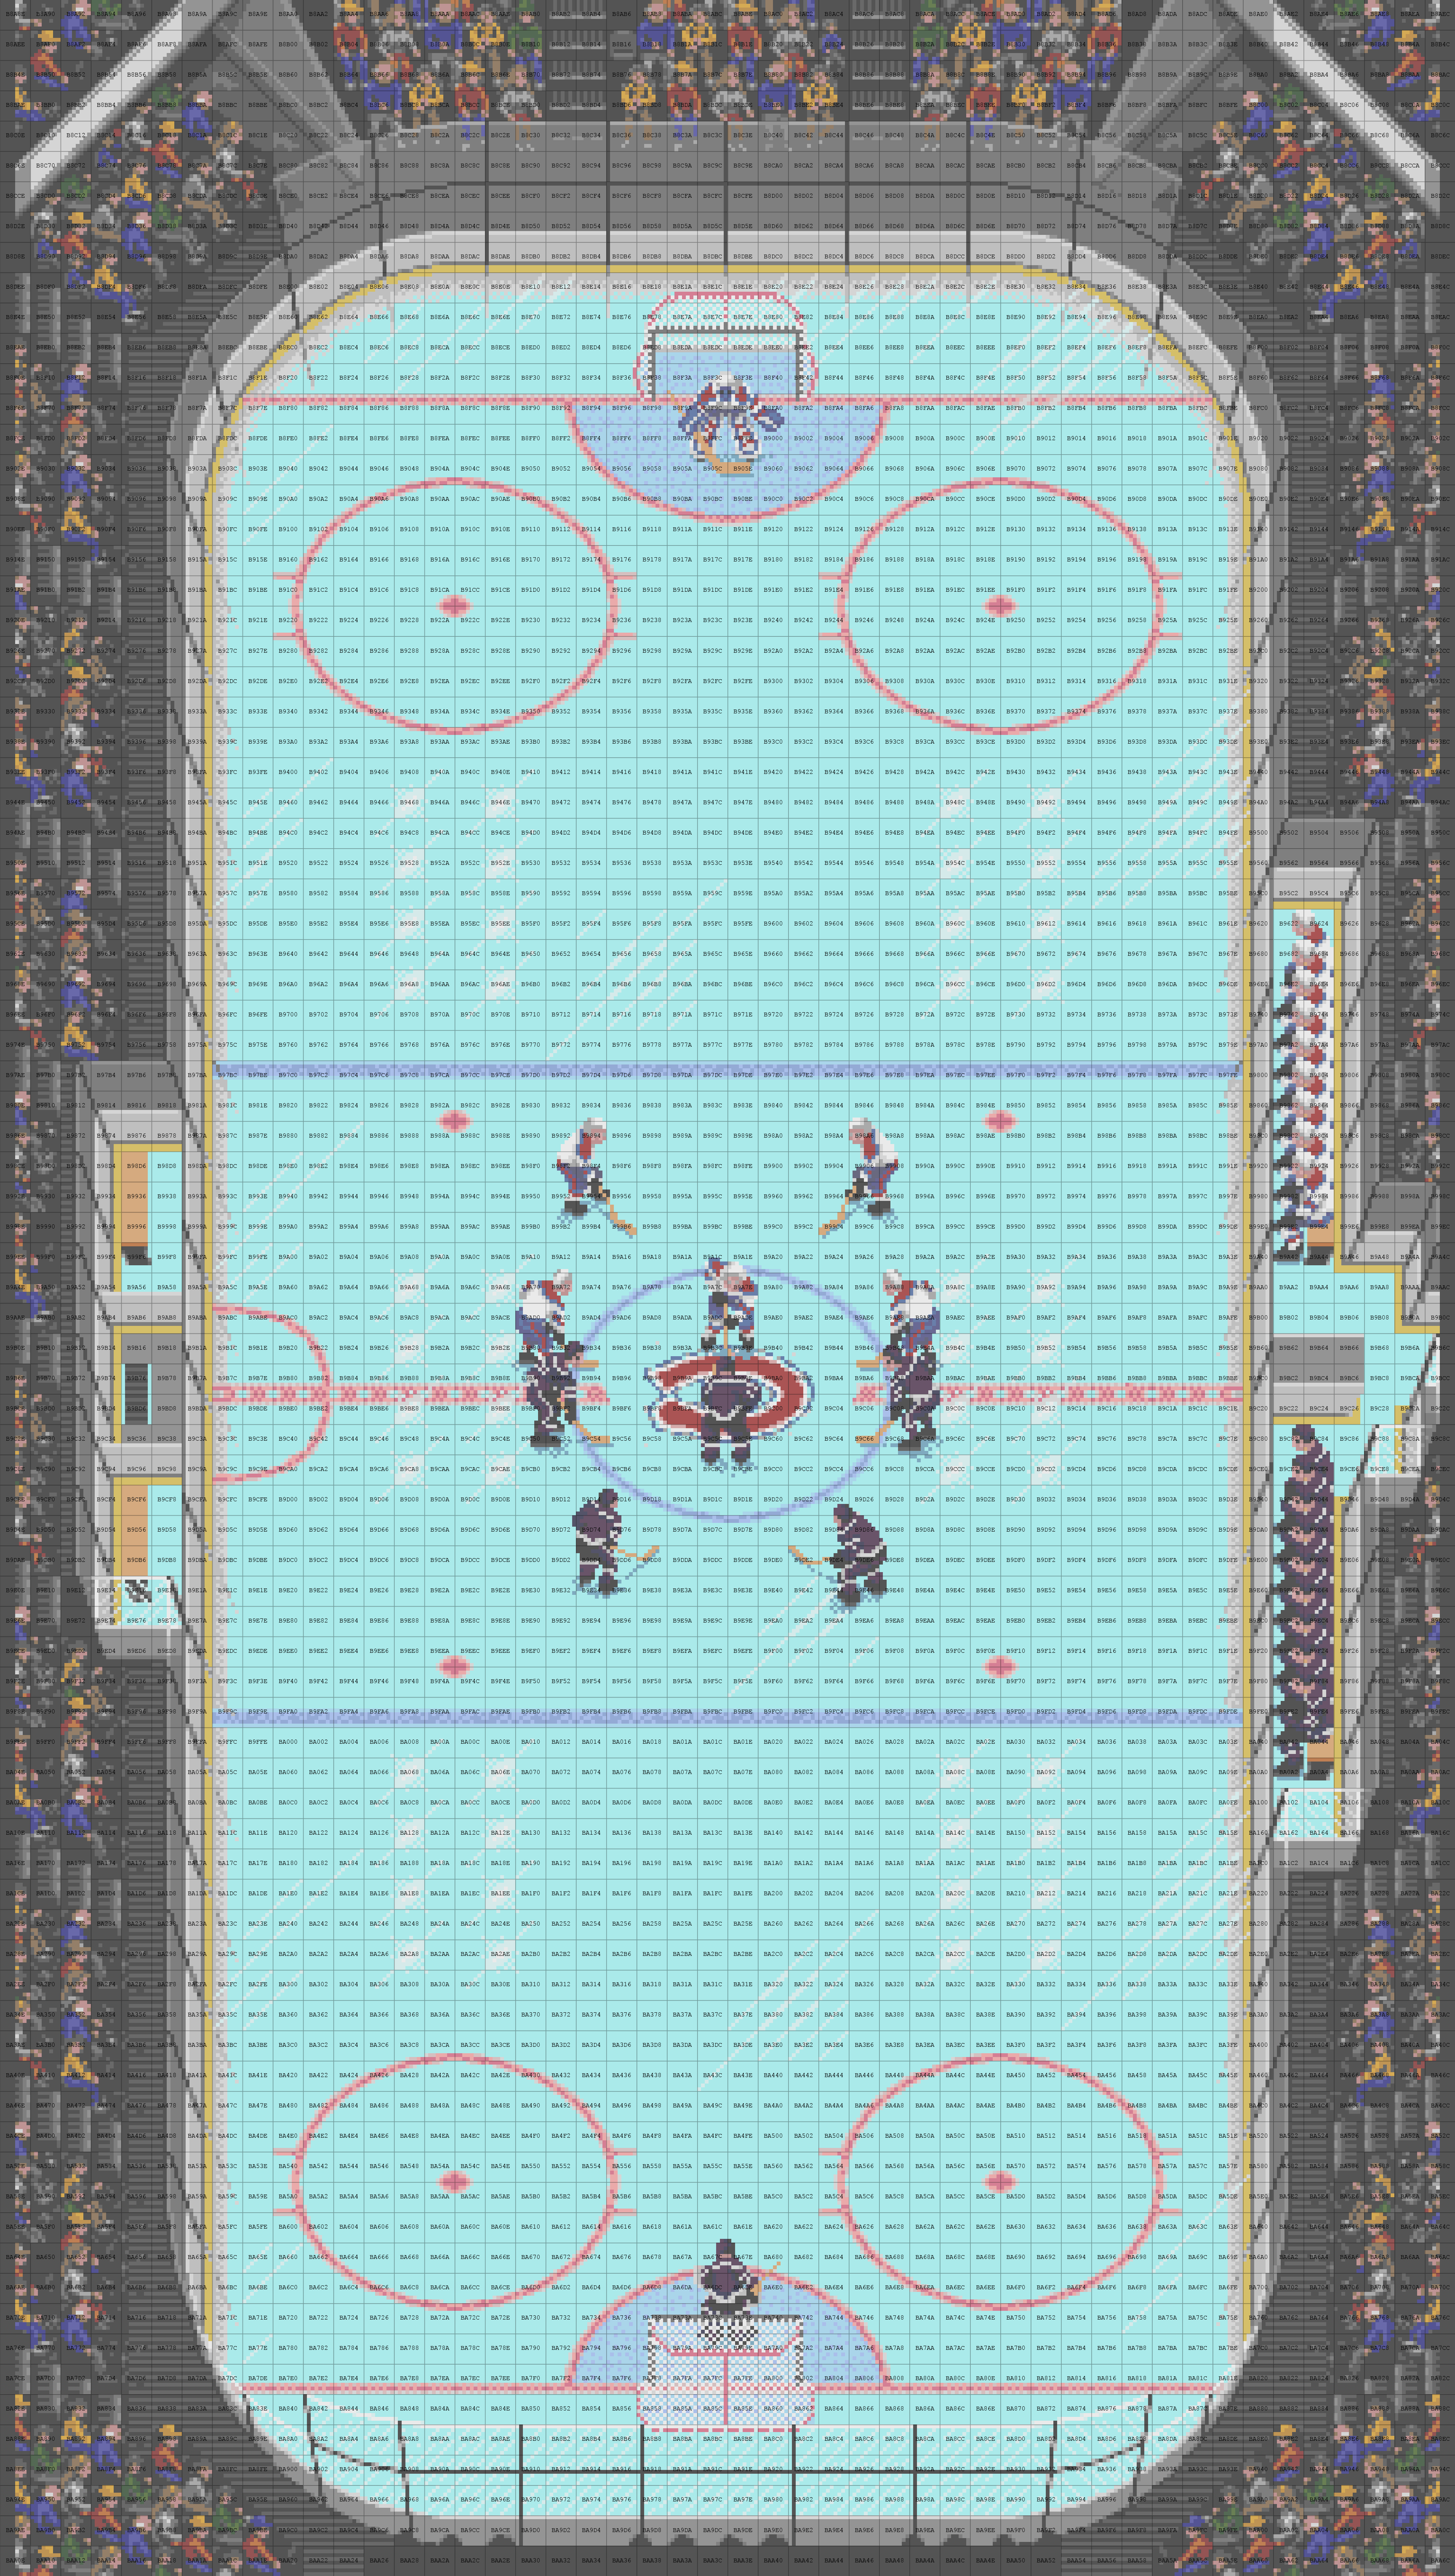
Rink
This is the background used when you are playing the game.
Tile Map
0xB8A8E to 0xBAA6C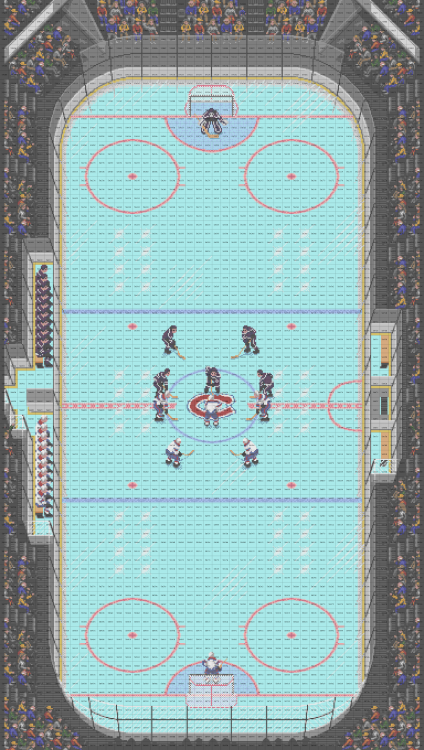
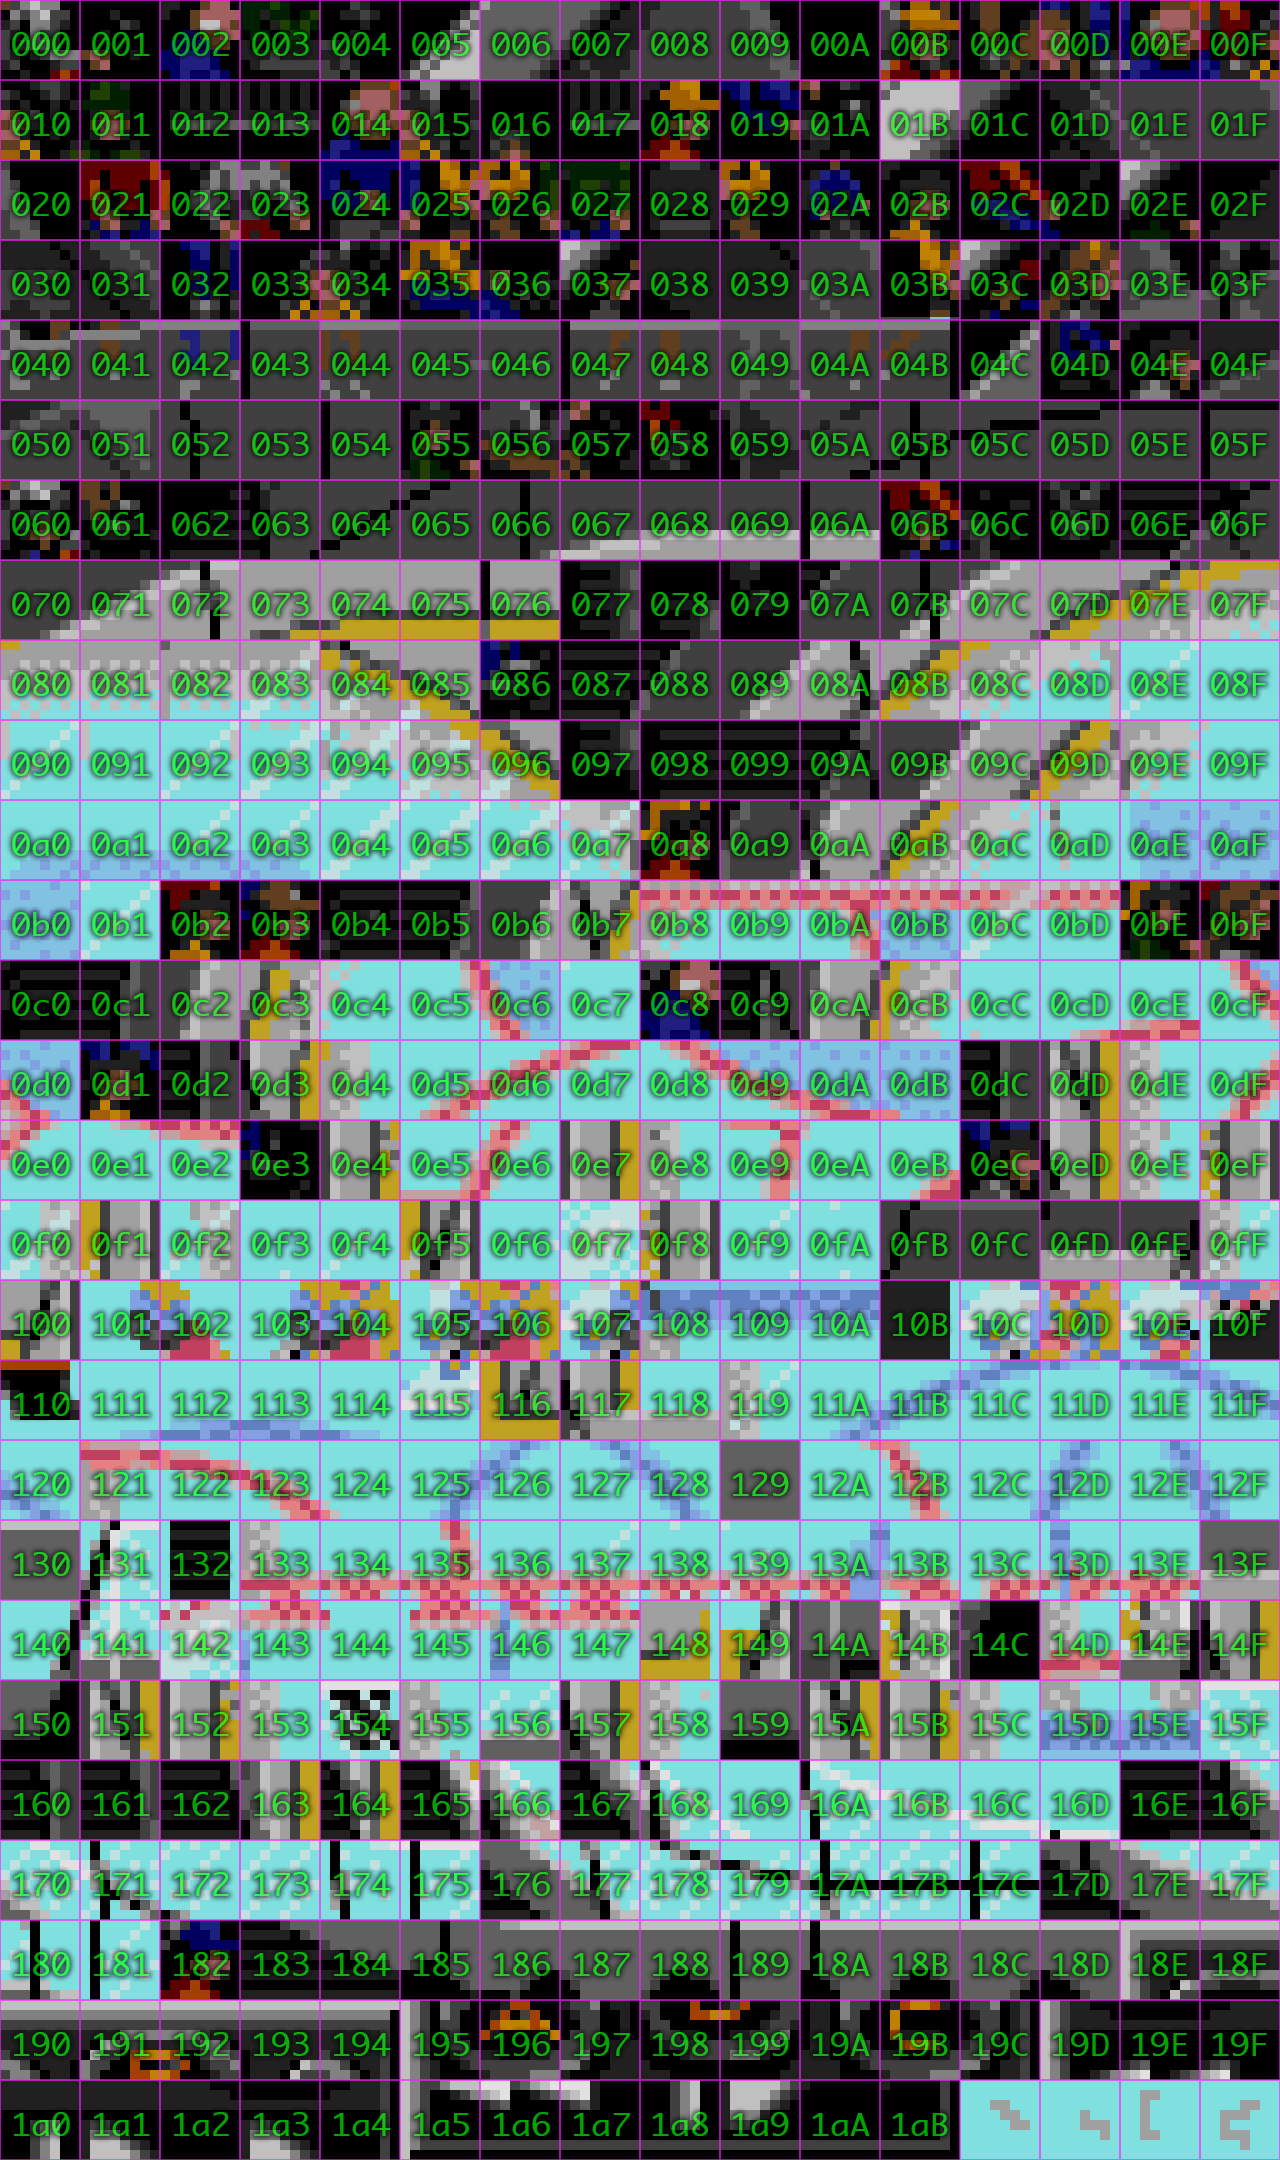
Tile Set
16 Columns x 27 Rows @
0xB518A (741770 decimal)
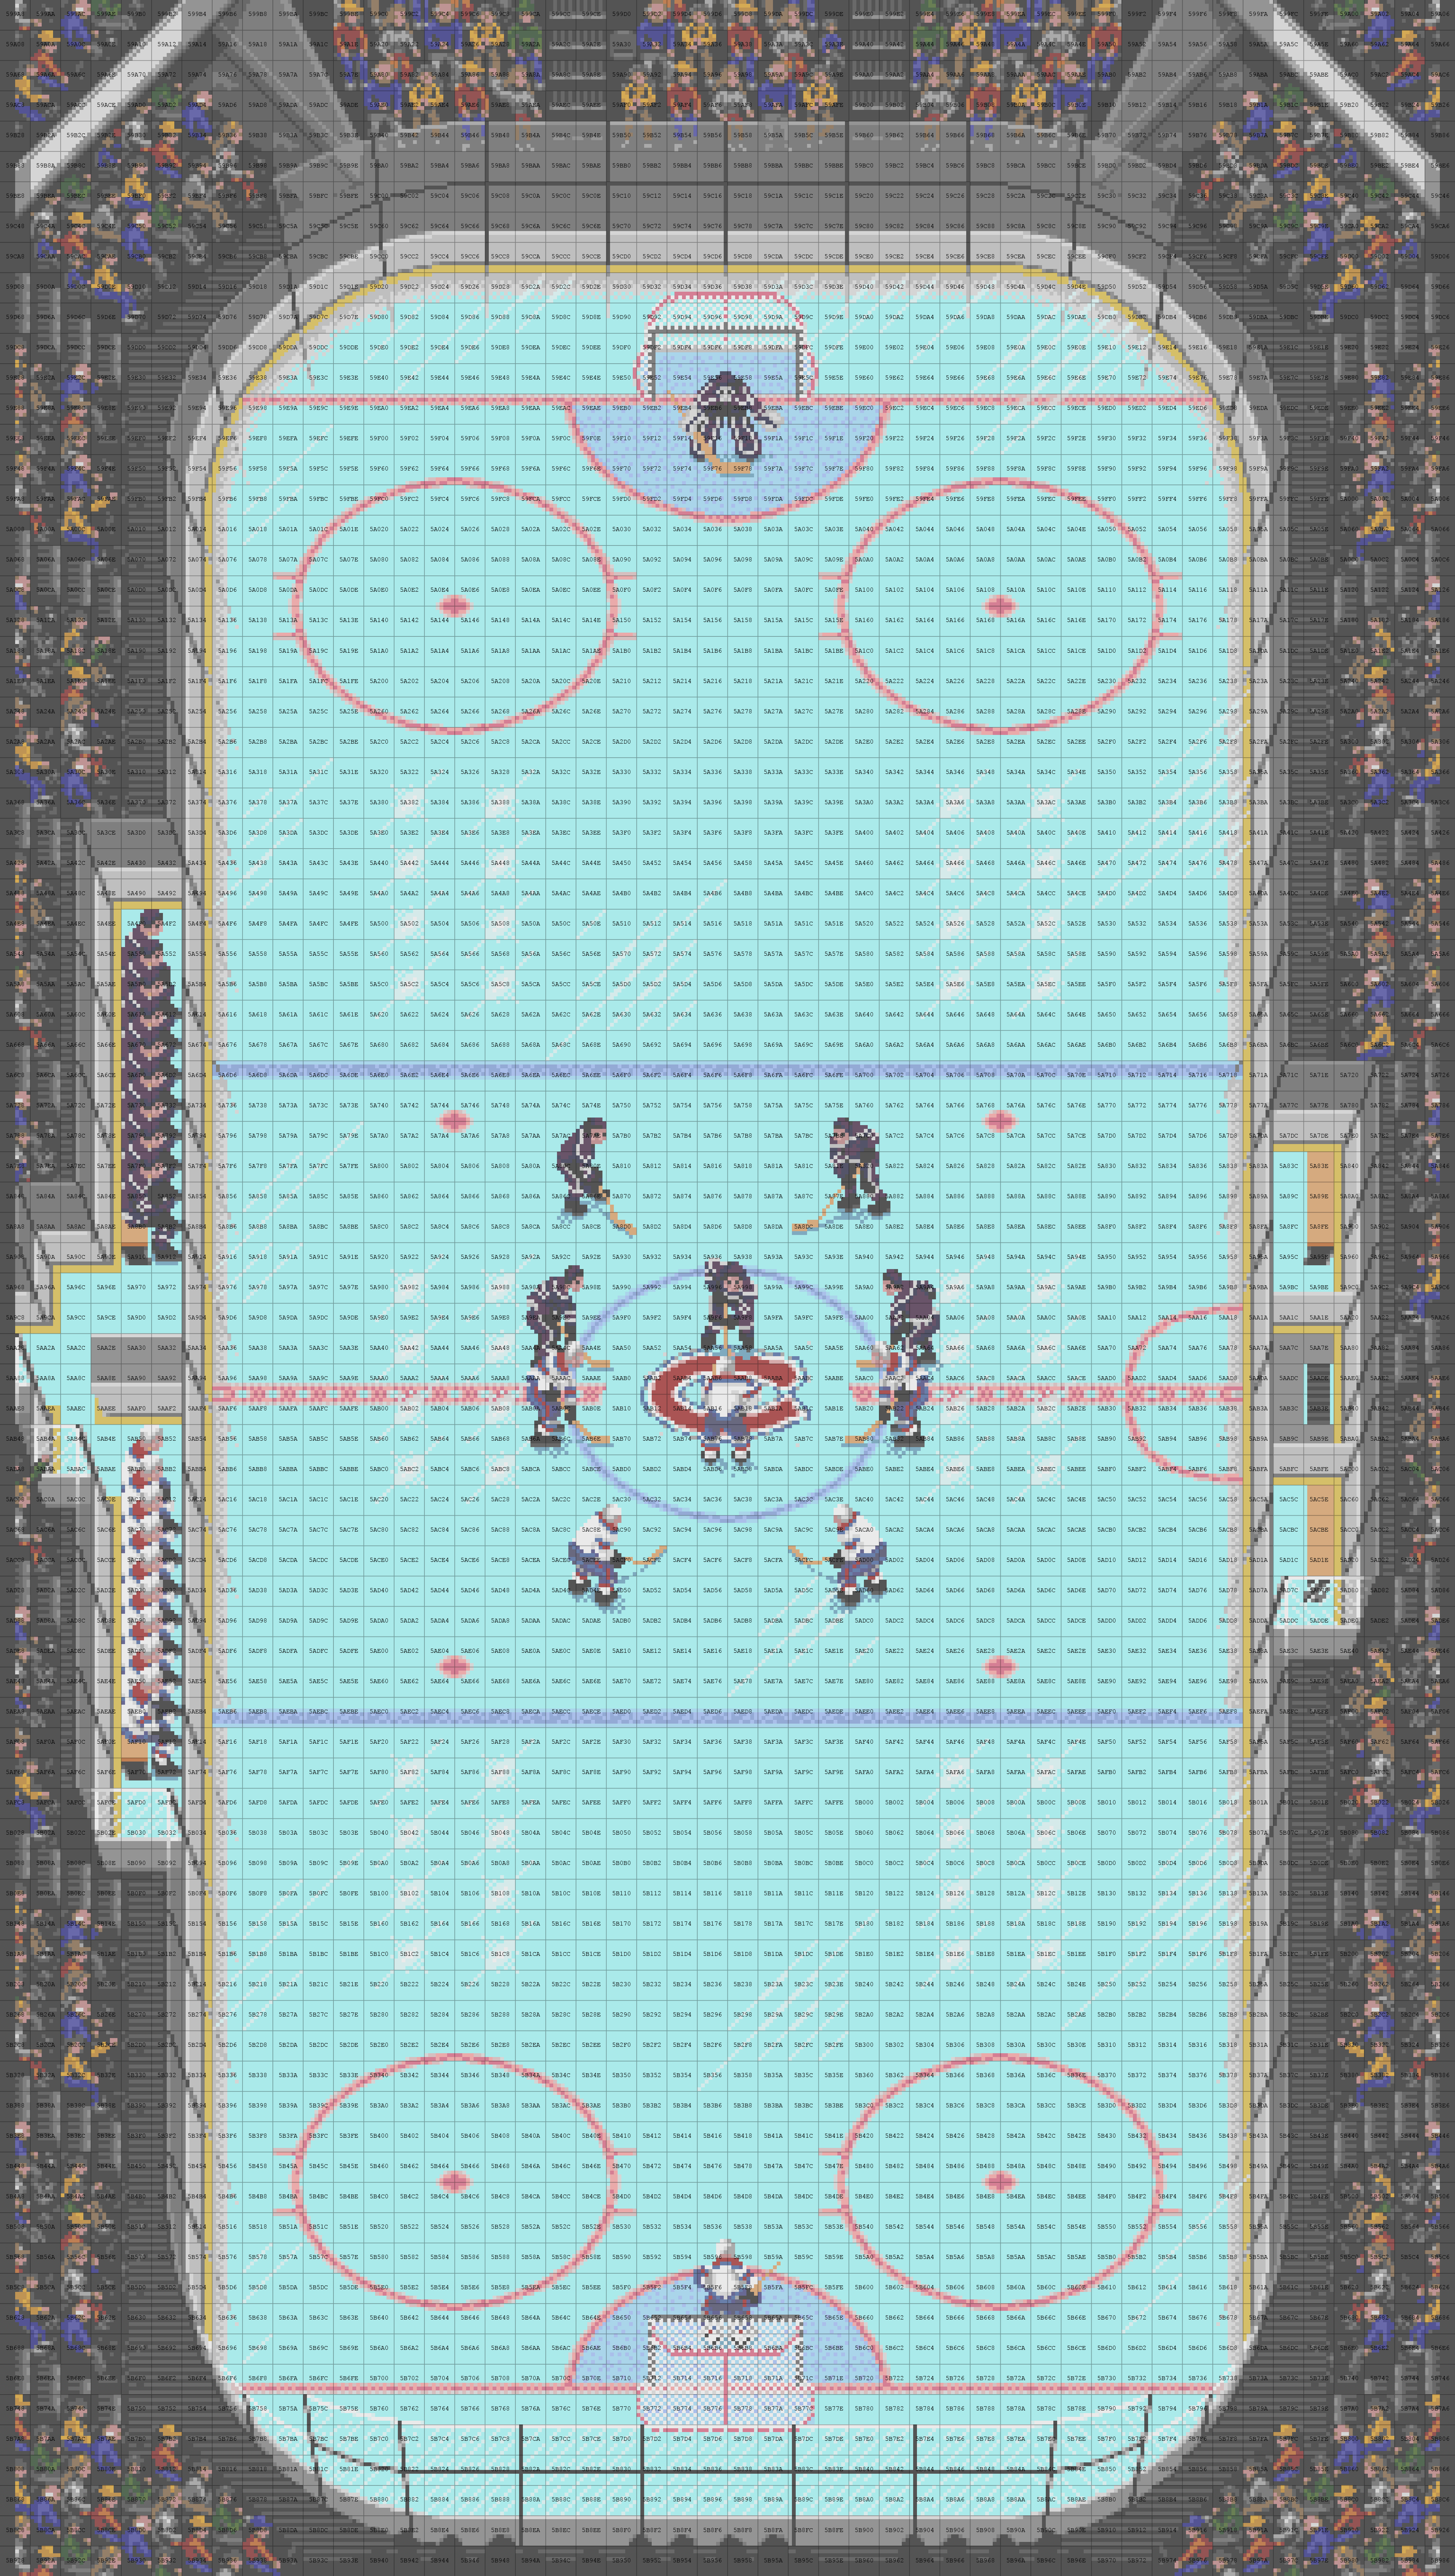
Rink (Reverse)
This is the background used when viewing the Instant Replay in Reverse view.
Tile Map
0x599A8 to 0x5B986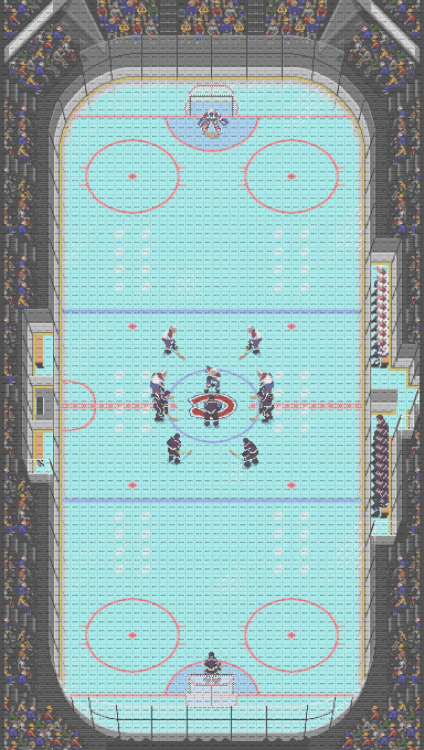
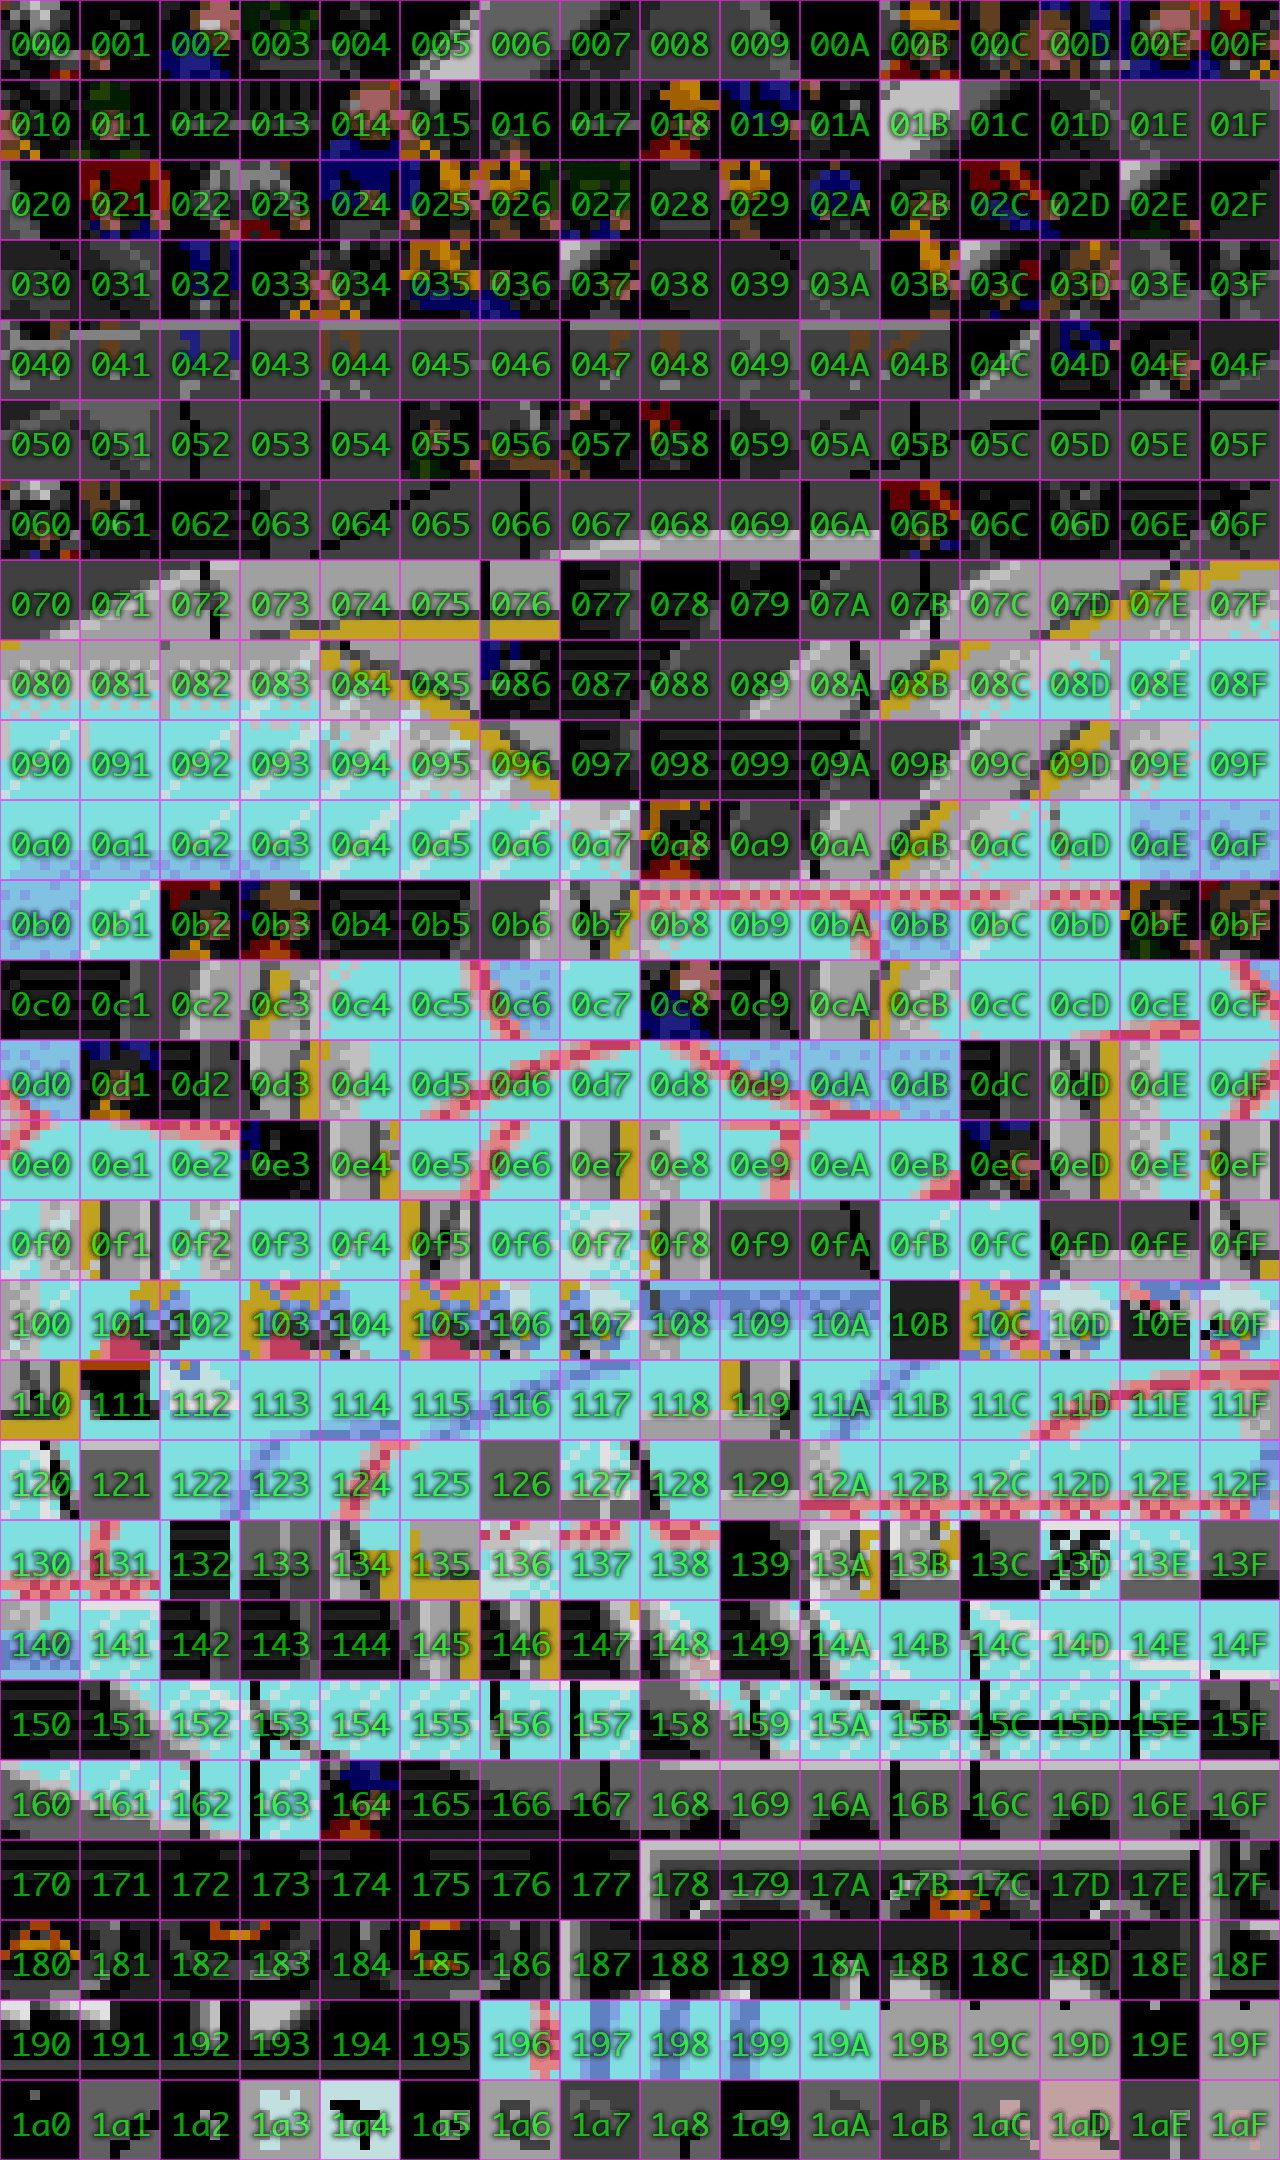
Tile Set
16 Columns x 27 Rows @
0x56064 (352356 decimal)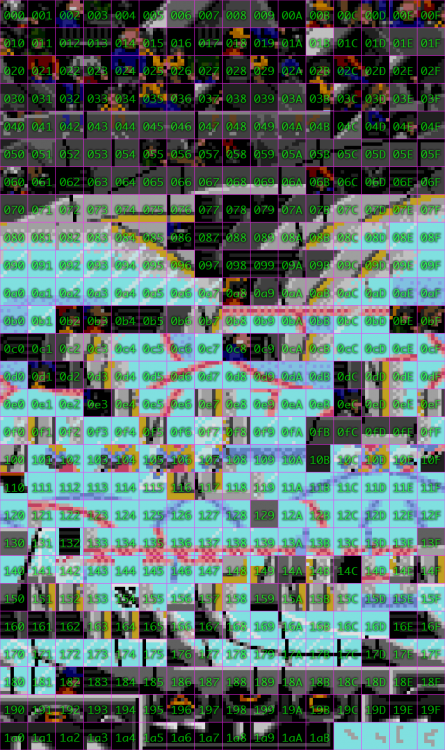
Overlays
These overlays appear over the screen in special circumstances.
Regular Overlays Tile Map
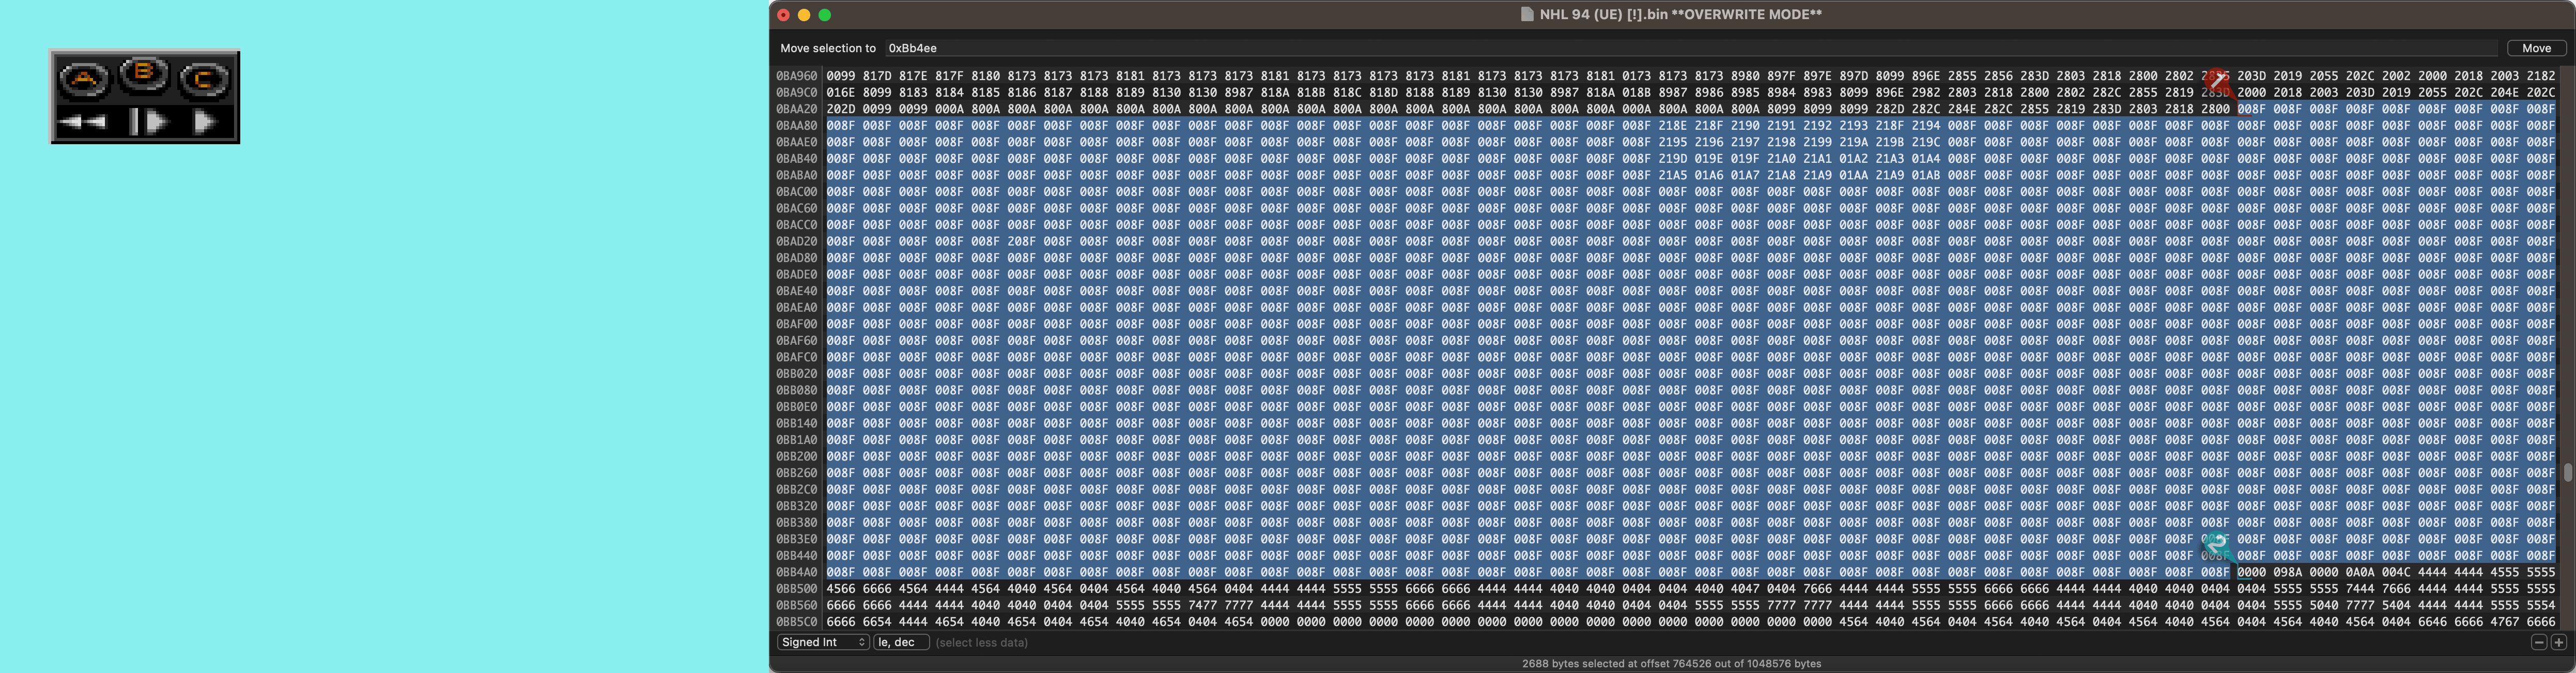
0x5B986 to 0x5C408Instant Replay Reverse View Overlays Tile Map
0xBAA6E to 0xBB4EE
Stars of the Game Graphic Overlay
This is the graphic that appears in the Stars of the Game overlay. By default there are not tiles being shown, but if you specify Rink tiles at these addresses, they will show up as per the diagram below.
0x5BBE2 to 0x5BBEE
0x5BC42 to 0x5BC4E
0x5BCA2 to 0x5BCAE
0x5BD02 to 0x5BD0E
Rink Instant Replay Controller Overlay
This is the controller overlay that briefly appears on the top left of the screen when initiating Instant Replay. It shares a Tile Set with the Rink.
0x5B9C8 to 0x5B9D8
0x5B9C8 to 0x5BA38
0x5BA88 to 0x5BA98
0x5BAE8 to 0x5BaF8
Rink (Reverse) Instant Replay Controller Overlay
This is the controller overlay that briefly appears on the top left of the screen when initiating Instant Replay Reverse View. It shares a Tile Set with the Rink (Reverse).
0xBAAAE to 0xBAABE
0xBAB0E to 0xBAB1E
0xBAB6E to 0xBAB7E
0xBABCE to 0xBABDE
Suggested Advanced Exercise
Share what you know! Write a post below sharing your best tips, tricks, resources, methods, whatever. Every little bit helps us all help eachother.
-
3
-
-
How-To Edit the Rink & Sideboards
2. IntermediateUnderstanding How Layouts are Specified
Within the Tile Map, each tile is specified using a 2-byte (4 digit) code. This code contains five parameters for each tile.
-
 Tile Set Reference
Which Tile from the Set should be used?
-
 Horizontal Orientation.
Should the tile be flipped Horizontally?
-
 Vertical Orientation.
Should the tile be flipped Vertically?
-
 Colour Palette.
Which Colour Palette should be assigned to this Tile?
-
 Z-Depth.
Should this Tile be shown in the background (standard), or as an overlay (overlapping Sprites)?
These five parameters are encoded in the 2-byte code as follows:- First digit = Vertical Orientation, Colour Palette, Z-Depth.
- 2nd digit = Horizontal Orientation
- 2nd, 3rd, & 4th digit = Tile Reference
Understanding the Tile Map Code
Here is how to read and specify Tile Map code.
-
Start with the Tile Reference
Lookup the three digit code for the Tile that you want to specify. Use that as your base.
+ x000 = The Tile in the first column, first row of the Tile Set.
-
Horizontal Orientation
Add 1 to the second digit in order to flip the Tile horizontally.
+ x8xx = Horizontally Flipped.
-
Vertical Orientation
Add 1 to the first digit in order to flip the Tile upside down.
+ 1xxx = Vertically Flipped.
-
Colour Palette
In the Rink & Sideboards, there are usually four colour palettes available. They are numbered 0,2,4,6.
Add the Palette number to the first digit.
+ 0xxx = First Rink Palette.
+ 2xxx = Second Rink Palette
+ 4xxx = Home Team Palette
+ 6xxx = Visitor Team Palette
-
Z-Depth
By default tiles will be shown in the background, behind sprites.
Add 8 to the first digit in order to specify the Tile as an Overlay (in front of Sprites).
+ 8xxx = First Rink Palette, Overlay.
Examples

- 009A = Use the Tile in Row 10, Column 11 of the Tile Set, with the First Colour Palette.
- 109A = Everything above, Second Colour Palette.
- 189A = Everything above, Horizontally flipped.
- 289A = Everything above, Vertically flipped.
-
A89A = Everything above, displayed as an Overlay.
Suggested Intermediate Exercise-
Check out the Tile Set for the Sideboards (in the previous Basics section). Notice how at the Tiles 049, 04A, 04B, 04C, 04D, 04E, 04F, 050, 052, 053, 054, 055 059, 05A, 05B, there appears to be some of the Tiles for the Pro-Set logo used in NHLPA Hockey ’93? These tiles don’t appear to be used anywhere.
-
Check out the Tile Map for the Sideboards (in the previous Basics section). Look at the Tiles from BDD44 to BDD4E, BDD84 to BDD8E, BDDC4 to BDDCE. That’s 18 tiles worth of space, doing nothing right now.
- Put some of those Pro-Set Tiles up on the big board, and test it in your Emulator. There are not enough tiles to create the full Pro-Set logo, but there is more than enough to practice placing, flipping, and setting Palettes for these tiles.
Once you can do that, it's time to move ahead to Advanced!
-
3
-
-
How-To Edit the Rink, Sideboards, & More
1. BasicsBefore We Get Started
Skills.
You will need to already have basic competence using a Hex Editor, and a Tile Editor with NHL ’94. Do a search on this forum to find resources to get those basics down first.Hex Editor.
I’ll be using Hex Fiend on my Mac, but you should use whatever you feel most comfortable with. They are almost all identical in principle.Tile Editor.
I can only recommend TileMolester 0.16, since it is the only one I use. I’m sure there are other ones that work great.Photoshop Compatible Bitmap Editor.
This isn’t necessary, but being able to use the included Photoshop compatible resources will make editing the Rink or Sideboards quicker & easier.Emulator.
I’ll be using the OpenEmu package which I highly recommend if you are on a Mac. If you are another platform, anything that can play Mega Drive ROMs and take pixel perfect screen shots will do.ROM.
Use any NHL 94 era ROM that you like, but if you want to follow along I’ll be using this test version of NHL ’94 ROM that has been modified to be 2 megs in size and to have the Checksum removed. This makes it slightly more adaptable for modding without changing anything of substance.NHL 94 (UE) [!] [h] 2MB.bin.zip
Principles
- Graphics are built from 8 x 8 pixel Tiles.
- These Tiles are utilized by a Tile Map, which specifies which Tiles to use, and how to use them.
- There is a Tile Set associated with each Tile Map. The Tile Map selects which tiles to use by references to this Set.
Tile Maps
The spatial information of the Tile Map is stored in a grid. Below is the Tile Map grid for the Sideboards. The Hex code shown above each 8x8 pixel tiles is the Address in the ROM where that Tile is specified in the Tile Map.

The Sideboards Tile Map starts at 0x0BDB6A and ends at 0x0BE268. Load the ROM in your Hex Editor and go to the address 0x0BDB6A, you will be at the top left tile of this Tile Map, and should see something like this.
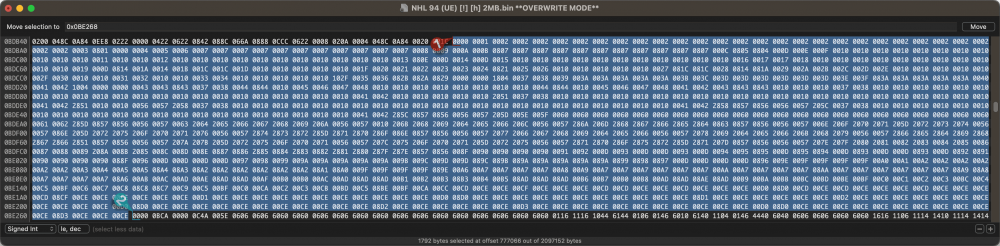
This is the code that specifies each Tile in the Tile Map.
Tile Set
At each Address in the Tile Map, you will find a reference to a Tile with the relevant Tile Set. Below is the Tile Set for the sideboards.
- Tile Sets are also stored as a grid, often 16 tiles wide.
- Go to address 0x0BDB6A in your ROM and you should see 0000, which means that it is using Colour Palette 0, and Tile 000 below.
- You may notice that some tiles look different in use (above) than in the Tile Set (below). This is because the Tile Map can specify a different Colour Palette, Horizontal & Vertical Orientation for each tile. More on this later.

Suggested Basic Exercise
Using your Hex Editor, take a look around at various addresses in the Tile Map. You should be able to…
- Find the exact tile address that you are looking for, and read the four digits (2 bytes) located there.
- Note how the last two digits at that address always correlates to the last two digits of the corresponding Tile in the Tile Set.
If you can do that, you should be ready to move ahead to Intermediate!
-
2
-
How-To: Edit the Rink, Sideboards, & More (NHL '94)
This thread collects the invaluable insights posted by @Drezz, @Jkline3, @kingraph, @smozoma, @von Ozbourne, @wboy, and others.
My goal here is to aggregate some of this information, and present it in a user friendly manner. Furthermore, I would encourage anyone to post their own tips and tricks below, and I will do my best to cross-reference them to this first post, or incorporate them into the Tutorial when I find time. I’ve separated information into multiple posts, which are indexed below.
Index
-
2
-
3
-
-
Yeeesh. Discovered another error in who I gave home ice advantage too. Fixed now. Plus all the non-playoff team updates are done as well. Barring any unforeseen issues, this should now be the final v4.x. Will take a break before starting the final version to be released on the eve of the finals.
Updated version posted.
-
-
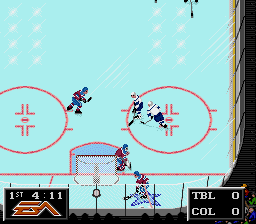
16 hours ago, AndrewB said:
FYI - I have had an error 3 or 4 times (screenshot attached). I am using the downloaded .bin on an emulation station. Each time, I am using St. Cloud St., but the opponent has been different. It always happens in the 1st Period. Wondering if this has happened to anyone else? Any idea what error it is?
Thanks.
P.S. This is a GREAT game!
I do get the same error, testing on my GenesisPlus based emulators. I've tested with Penalties On and Off, no difference. I trie a few other little experiments, no luck. Error always exactly the same. I've been scratching my head trying to figure this out, but am stumped. The fact that it's a consistent error code, makes me think that it is fixable, but who knows how much time and energy it might take to even get to the bottom of it.
-
ROM Header (v23.4.0 / 2023 04 16)
The ROM Header has had a few customizations applied.
- Domestic and Foreign ROM names have been set.
- Region has been expanded to include Japan.
- 6-Button Controller support has been indicated.
- The Checksum has been fixed.
It is debatable if all, or any of these mods are necessary, but they don’t hurt, and should hypothetically improve compatibility with some hardware or emulator configurations. You can read more about setting your ROM header here:
https://plutiedev.com/rom-header
The ROM Name is 48 bytes long, and must be filled with space characters (20) to fill out that allocation.
Domestic ROM Name @
0x0120Foreign ROM Name @
0x0150Original (NHL Hockey ’94)
4E48 4C20 484F 434B 4559 2027 3934 3A20 3230 3233 2045 4449 5449 4F4E 2020 2020 2020 2020 2020 2020 2020 2020 2020 2020
Revised (NHL Hockey ’94: 2023 Edition)
4E48 4C20 3934 3A20 3230 3233 2045 6469 7469 6F6E 2020 2020 2020 2020 2020 2020 2020 2020 2020 2020 2020 2020 2020 2020
The Region Code is 16 bytes long, and must be filled with space characters (20) to fill out that allocation.
Region Code @
0x01F0Original (USA & Europe)
5545 2020 2020 2020 2020 2020 2020 2020
Revised (Japan, USA & Europe)
4A55 4520 2020 2020 2020 2020 2020 2020
The Device Support Code is 16 bytes long, and must be filled with space characters (20) to fill out that allocation.
Device Support @
0x0190Original (Regular Gamepad only)
4A20 2020 2020 2020 2020 2020 2020 2020
Revised (Regular Gamepad & 6-Button Controller)
4A36 2020 2020 2020 2020 2020 2020 2020
The Checksum Code is 2 bytes long.
Checksum @
0x018EI use a desktop app to do this for me. There are many apps out there that can do this simple task. I recommend that you always fix the checksum as the very last step of your mod, even if you have coded it to bypass the checksum check.
-
Player Cards - Vegas & Washington Crash Fix (v24.1.0 / 2023 12 01)
With the invaluable 32-Team ROM template, the User Records system is not fully functional, and this will cause the Player Cards to crash in certain circumstances, when using Washington or Winnipeg.
I spent an obsessive amount of hours trying to understand the Player Cards & User Records systems, and to update them back to full functionality with 32-teams. I got close, but was never able to get it done. And very unfortunately, my research notes on this are an incomprehensible mess. The following modification will disable showing user records in the Player Cards, which will in turn prevent any crashes.
Player Cards - Washington Crash Fix @
0xFA49C / 0xFA4A8 / 0xFA5F2 / 0xFA5FEOriginal
3238
Revised
0000
-
How-to: “Stars of the Game” Layout (v24.1.0 / 2023 12 01)
The “Stars of the Game” layout and typesetting has been altered. You can move elements around and make adjustments as follows.
Box for Stars of the Game
Left Edge @
0x18541Original
02Revised
01Y-Axis @
0x18542Original
0ERevised
-
Right Edge @
0x18545Original
1CRevised
1E
Height @
x18547Original
09Revised
-
Text: Stars of the Game
X-Axis / Y-Axis @
0x18553Original
0910Revised
0A10
Graphic: Stars of the Game Sponsor / Icon
X-Axis / Y-Axis @
0x18567Original
030FX-Axis (again? I don't understand!) @
0x18569Original
00
Text: Player Number, Name, & Team
Y-Axis @
0x18591Original
12Revised
11
Text: Player Team
X-Axis @
0x1859DOriginal
1ARevised
03
Text: Player Number & Name
X-Axis @
0x185B9Original
03Revised
07
References:


How-to: Change the Colour Palette for the Puck, and more… (NHL '94)
in How-To & Reference
Posted · Edited by AdamCatalyst
standardizing naming and formatting.
How-to: Change the Colour Palette for the Puck & more (NHL '94)
The Journey
I couldn't stop thinking about this. I obsessed over the code for a few hours and eventually got too frustrated, so I went for a short walk. When I sat back down I looked at my notes again, and it hit me…
There's more here than just the puck. I believe that using this logic to navigate this section of code has untapped potential to modify some previously out of reach elements. So far, the quick tests I've done have seemed to support that notion.
I make no claims that this is complete, but I have the elusive "Home Team Colour" puck seemingly working right now. I'll leave the rest up to whoever can take on the next leg of the journey. I'm done my quest for now.
Home Team Coloured Puck
Resources
If you don't understand what this code is doing, check out this post which will teach you the basics, and so much more.